Switching to recessed lighting—often called "can lights" or "downlights"—is a very common project for new homeowners. It can feel intimidating because it involves electricity and cutting into drywall, but with the right preparation, it is a manageable task.
The key is determining exactly what kind of installation you need: are you just swapping out an old bulb and trim, replacing a hanging fixture with a recessed one, or cutting a brand new hole in the ceiling?
Let’s walk through the process safely and calmly.
Common Signs You Need an Update
Usually, homeowners consider this project for aesthetic reasons, but there are functional signs that it’s time to get to work:
- Flickering lights: This often indicates a loose connection or an incompatible dimmer switch with modern LED bulbs.
- Old fixture not working: If changing the bulb doesn’t fix it, the internal socket or wiring of the old fixture may be shot.
- Loose, frayed wires: If you see this when changing a bulb, it is a safety hazard that needs immediate attention.
Important Safety Check: Do You Have Power?
Before we begin, we need to clarify the scope of your project.
Safe to try yourself:
- Replacing an existing ceiling light with a recessed light (provided the wiring is already there).
- Retrofitting an LED insert into an existing recessed housing.
Call a professional immediately if:
- You want a light in a spot where there is currently no wiring. Running new electrical cable through the ceiling joists is a complex task that requires a licensed electrician.
- You discover aluminum wiring (silver-colored) instead of copper. This is common in homes built in the mid-60s to early 70s and requires specific handling.
- You are uncomfortable working on a ladder or handling basic electrical connections.
Phase 1: Diagnosis and Preparation
Before you buy parts or climb a ladder, we need to know what you are working with.
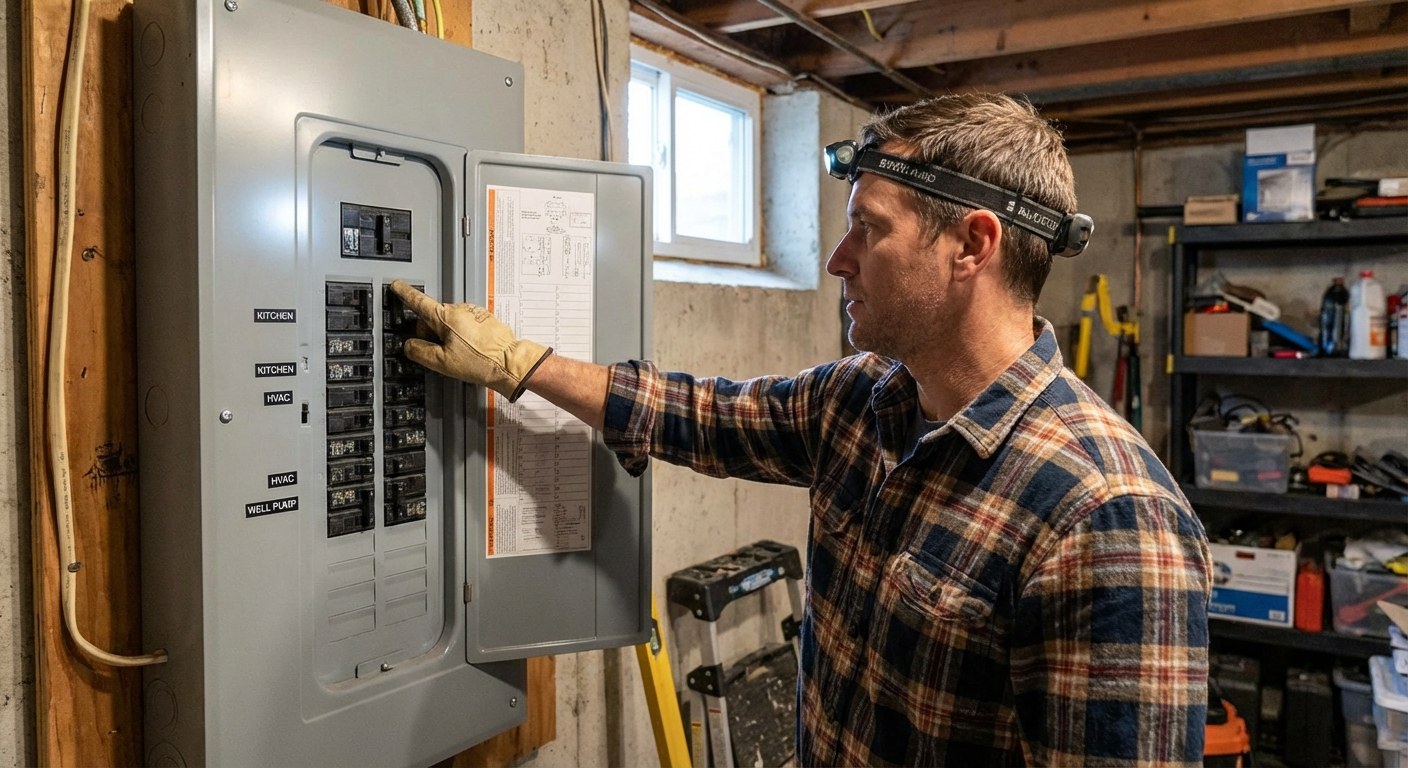
Step 1: Turn off the power
Never work on a live circuit. Go to your electrical panel, flip the breaker for the room you are working in to "OFF," and place a piece of tape over it so nobody turns it back on by mistake.
Step 2: Inspect the location
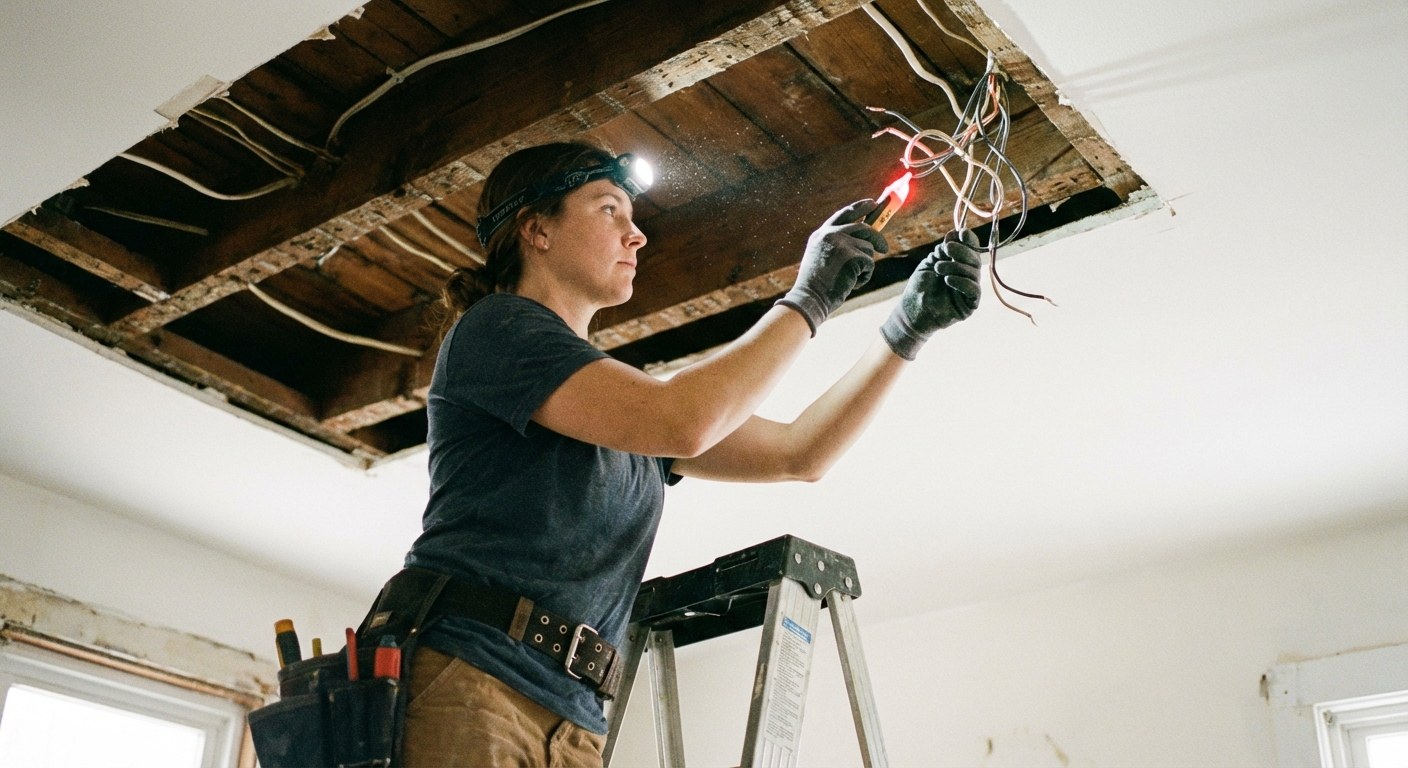
Use a non-contact voltage tester (a small pen-like tool that beeps if power is flowing) to confirm the power is truly off.
Step 3: Determine your housing type
- Retrofit: You already have a recessed "can" in the ceiling and just want to update the look or switch to LED.
- Remodel Housing: You are removing an old hanging light (like a boob light or chandelier) and replacing it with a recessed light.
- New Construction: You have open ceiling beams (no drywall). This guide focuses on existing ceilings (Retrofit and Remodel).
Phase 2: Removing an Old Fixture
Estimated Time: 15 minutes
If you are replacing a standard hanging light with a recessed one, you first need to remove the old unit.
- Support the fixture: While standing on a sturdy ladder, hold the fixture canopy (the part touching the ceiling) with one hand.
- Unscrew the mount: Use a flathead or Phillips screwdriver to loosen the mounting screws.
- Lower and test: Gently pull the fixture down to expose the wires. Use your voltage tester on the wires one more time to be absolutely certain the power is off.
- Disconnect: Twist off the plastic wire nuts and separate the black (hot), white (neutral), and bare/green (ground) wires. Remove the old fixture.
Now you have a hole in your ceiling with wires hanging out. This is where the new recessed light will go.
Phase 3: Installing the Recessed Light
Estimated Time: 20–45 minutes
There are two main paths here depending on what you found in the ceiling.
Option A: The Retrofit (The Easiest Path)
Use this if there is already a recessed housing (a metal can) installed in the ceiling.
- Check the housing: Ensure the metal can is securely fastened to the joists.
- Connect wires: If you are installing an LED retrofit kit, it likely has a screw-in adapter that goes into the light bulb socket, or a quick-connect plug. Connect these according to the instructions.
- Insert the trim: Squeeze the metal spring clips on the side of the new light, slide the unit into the can, and push up until the trim is flush with the ceiling.
Option B: The Remodel Can (Replacing a Standard Light)
Use this if you just removed a standard light fixture and now have a rough hole in the drywall.
1. Prepare the opening
Your new recessed light will come with a template. If the existing hole from your old light is too small, trace the new template over the hole. Use a drywall saw (keyhole saw) to carefully cut the hole to the correct size.
Note: Be careful not to cut the existing wires while sawing.
2. Choose the right housing (IC vs. Non-IC)
- IC-Rated (Insulation Contact): Essential if you have insulation in your ceiling that will touch the light housing. These prevent overheating.
- Non-IC Rated: Only use these if there is no insulation touching the fixture. You must leave at least 3 inches of clearance around the metal housing.
3. Wire the new housing
- Open the junction box attached to the new recessed light arm.
- Feed the house wires into the box and secure them with the built-in clamp.
- Strip about 1/2 inch of insulation off the wire ends if needed.
- Connect color to color: Black to Black, White to White, Ground to Ground (usually green or bare copper). Use wire nuts to secure them.
- Close the junction box cover.
4. Insert the housing
- Push the junction box and wires up into the ceiling hole.
- Slide the metal housing can into the hole.
- Push the housing flush against the drywall.
- Look for the mounting clips (usually three or four black metal clips inside the can). Push them outward and up until they snap or lock into place, clamping the unit tightly against the drywall.
5. Install the trim
Depending on your model, snap the LED trim into place or screw in your light bulb.
Time and Cost Expectations
This is generally an affordable upgrade that adds significant modern appeal to a room.
- DIY Cost: $20–$50 per light fixture.
- Professional Cost: $150–$250 per fixture if wiring is already present. If new wiring needs to be run, costs can exceed $300 per fixture.
- Time: 45–90 minutes for the first light; 20–30 minutes for each subsequent light once you get the hang of it.
When to Stop and Call a Pro
If you install the light, turn the power back on, and the breaker immediately trips (flips back to off), stop. You likely have a short circuit where a hot wire is touching metal.
If you turn the switch on and nothing happens, double-check your connections. If it still doesn't work, or if you hear buzzing or smell burning plastic, turn the breaker off immediately and call an electrician.
Recap
Installing recessed lighting is a great skill to learn. It involves:
- Verifying the power is off.
- Removing the old fixture safely.
- Selecting the right housing (IC-rated is usually safest).
- Connecting the wires (black to black, white to white).
- Securing the housing to the drywall.
This type of project requires keeping track of parts, measurements, and safety steps. This is exactly where Casa can help you stay organized. You can save the specs of the lights you buy, track which circuit breaker controls which room, and keep a log of when you installed them for future reference.
Ready to tackle more home updates? Download the Casa app today for personalized guides and a digital home for all your maintenance needs.


