There are few things less pleasant than turning on your hot water tap for a shower or to wash dishes, only to be greeted by a foul smell or murky, discolored water. Whether it’s a “rotten egg” odor, a rusty brown tint, or cloudy water, it’s a problem that instantly ruins your day.
The good news is that smelly or discolored hot water is a common household issue, and in most cases, it’s something you can fix yourself. The problem usually originates inside your water heater, where sediment, bacteria, or a corroded part can wreak havoc.
Here at Casa, we believe in empowering homeowners to tackle these problems head-on. So, let’s walk through this together. We’ll help you diagnose the source of the issue and provide step-by-step instructions to get your hot water running clean and fresh again.
First Step: Is Your Water Heater Really the Culprit?
Before you start working on your water heater, we need to be sure it’s the source of the problem. Sometimes, issues with the municipal water supply or your home’s plumbing can affect both your hot and cold water. Let’s run a quick and easy diagnostic test.
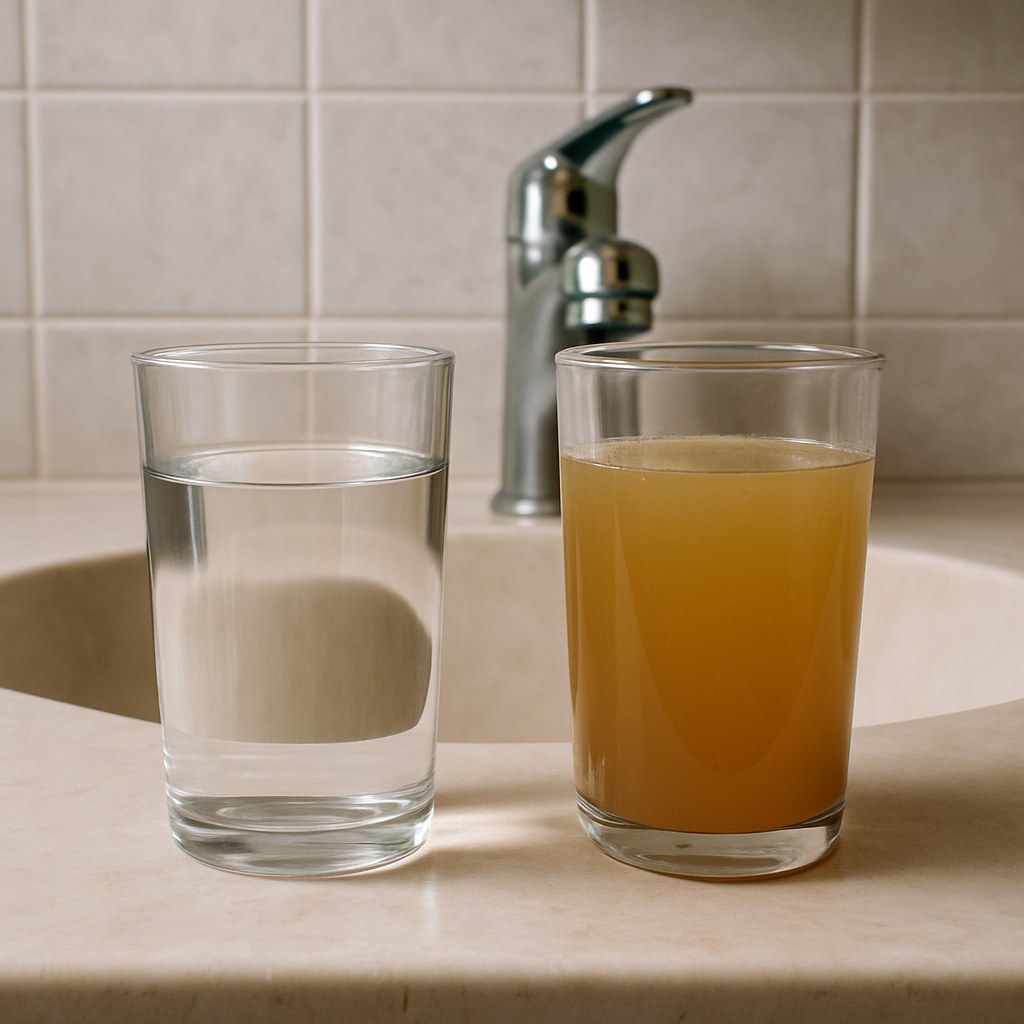
The Two-Glass Test:
- Grab two clean, clear glasses.
- Go to any sink in your house and turn on the cold water tap. Let it run for about 30 seconds, then fill one of the glasses.
- Now, turn on the hot water tap at the same sink. Let it run until it’s fully hot, then fill the second glass.
- Take both glasses to a well-lit area and compare them. Look at the color and carefully smell each one.
What did you find?
- If both the hot and cold water are discolored or smelly: The problem is likely not your water heater. It’s probably an issue with your home’s overall plumbing or the water supply coming into your house. In this case, your best bet is to call a professional plumber to investigate further.
- If only the hot water is discolored or smelly: Congratulations, you’ve confirmed the issue is with your water heater! This is a problem we can work on together. Keep reading.
Know Your Heater: Tank vs. Tankless
The next step is to identify what kind of water heater you have, as the solutions are different.
- Tank-Style Water Heater: This is the most common type. It’s a large, cylindrical tank (usually 40-80 gallons) that heats and stores water, so it’s always ready. You’ll typically find it in a basement, garage, or utility closet.
- Tankless Water Heater: Also known as an on-demand water heater, this is a smaller, wall-mounted unit. It heats water instantly as it passes through, rather than storing it.
Once you know your type, follow the appropriate guide below.
How to Fix a Tankless Water Heater
If you have a tankless water heater, the most likely cause of odors or discoloration is mineral buildup, also known as "scale." Over time, calcium and magnesium deposits can coat the inside of the heating elements, affecting water quality. The solution is to descale the unit.
This process takes about an hour and is a crucial part of regular maintenance.
Guide to Descaling Your Tankless Water Heater:
- Power Down: Turn off the power to your water heater at the circuit breaker.
- Shut Off Water: Close the main cold and hot water valves that connect to your unit. These are usually located directly on the pipes leading into and out of the heater.
- Set Up the Pump: Your tankless heater should have service valves for descaling. Connect two short hoses to these valves. Place the other ends of the hoses and a small submersible pump into a 5-gallon bucket.
- Add Descaling Solution: Pour about 2 gallons of undiluted white vinegar into the bucket. This is a safe and effective descaling agent.
- Circulate the Solution: Open both service valves on the water heater. Plug in the submersible pump and let it circulate the vinegar through the unit for at least 45 minutes. This will dissolve the mineral deposits.
- Flush the System: Turn off the pump, close the service valves, and disconnect the hoses. To flush out the vinegar, briefly open the main cold-water inlet valve for a couple of minutes, letting the water drain from the hot water service port into the bucket.
- Return to Service: Close the service valves and reopen the main hot and cold water valves. Restore power to the unit at the circuit breaker.
- Test It: Run a hot water faucet for a few minutes to clear any remaining vinegar. The water should now be clear and odor-free!
If descaling doesn’t solve the problem, it’s time to call an HVAC technician for a professional diagnosis.
How to Fix a Tank-Style Water Heater
For traditional tank heaters, there are three primary solutions, ranging from simple maintenance to a more involved parts replacement. Let's start with the easiest one first.
Step 1: Flush the Tank to Remove Sediment
Over time, sediment, rust, and minerals from the water supply settle at the bottom of your water heater tank. This sludge can cause rusty or brown discoloration and sometimes even a musty smell. Flushing your tank annually is the best way to prevent this.
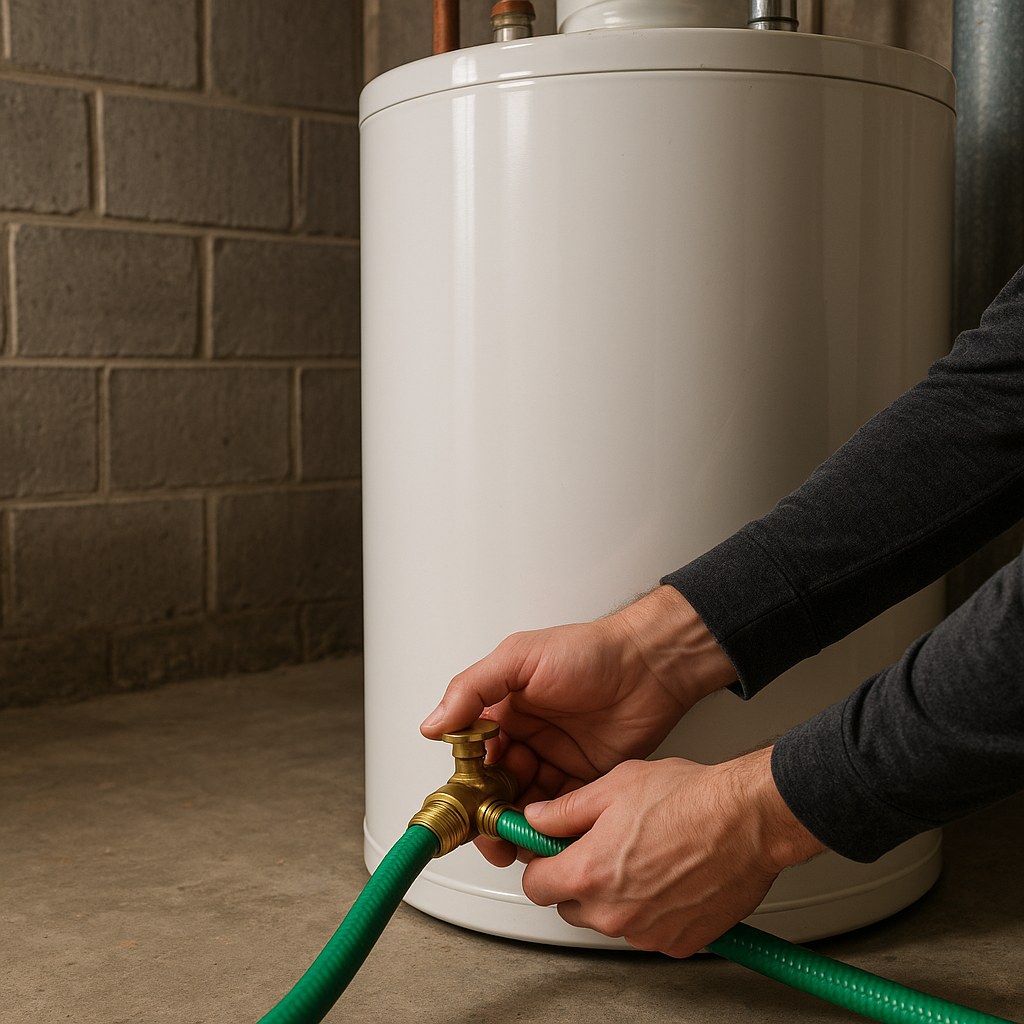
Guide to Flushing Your Water Heater:
- Turn Off the Heater: For a gas heater, turn the thermostat dial to the ‘OFF’ or ‘PILOT’ position. For an electric heater, turn off the power at the circuit breaker.
- Shut Off the Water: Close the cold-water supply valve, which is usually located on a pipe above the tank.
- Connect a Hose: Attach a standard garden hose to the drain valve at the bottom of the tank. Run the other end of the hose to a floor drain or outside.
- Let Air In: Open a hot water faucet somewhere in your house (the kitchen sink is a good choice). This prevents a vacuum from forming and allows the tank to drain properly.
- Drain the Tank: Open the drain valve on the tank. The water will start to flow out. Let it drain until the water running out of the hose is clear. You might see rusty, sediment-filled water at first—that’s a good sign you’re clearing out the gunk!
- Close Up: Once the water runs clear, close the drain valve and disconnect the hose. Close the hot water faucet you opened earlier.
- Refill and Restart: Reopen the cold-water supply valve to refill the tank. You’ll hear it filling up. Once it's full (the sound of filling will stop), turn the power or gas back on.
Wait about 30-60 minutes for the water to heat up, then test a faucet. If the discoloration is gone, you've solved the problem! If not, or if your main issue was a "rotten egg" smell, move to the next step.
Step 2: Sanitize the Tank to Kill Bacteria (For Rotten Egg Smells)
That distinct "rotten egg" or sulfur smell is almost always caused by sulfate-reducing bacteria. These harmless but stinky microorganisms can thrive in the warm, sludgy environment at the bottom of a water heater tank. They feed on sulfates in the water and produce hydrogen sulfide gas—the source of the smell.
The simplest way to kill them is with heat.
Guide to Sanitizing Your Water Heater:
- Crank Up the Heat: Turn the thermostat dial on your water heater up to 140°F (60°C). Warning: This water will be extremely hot and can cause scalding. Make sure everyone in the household is aware.
- Wait It Out: Let the heater sit at this high temperature for at least 8 hours. This is long enough to kill the bacteria throughout the tank.
- Reset Temperature: After 8 hours, turn the thermostat back down to your normal setting, which is typically 120°F (49°C) for safety and efficiency.
- Flush the Lines: Go to every hot water faucet in your house and run it for 5-10 minutes to flush the super-heated water and any remaining bacteria out of your plumbing lines.
If the smell is gone, you’re all set! If it returns after a few days or weeks, it’s a sign of a deeper issue, which brings us to our final step.
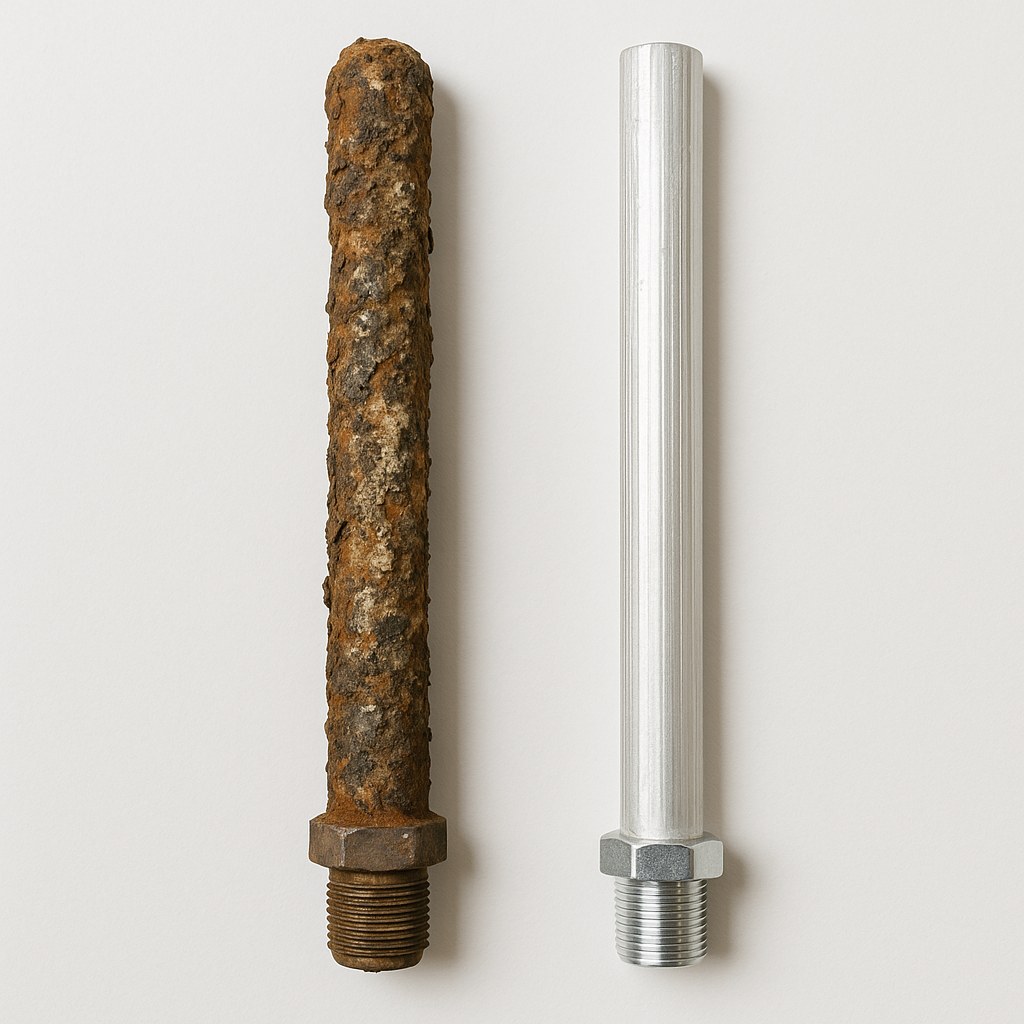
Step 3: Replace the Anode Rod
Inside every tank-style water heater is a long metal pole called an anode rod. Its job is to corrode so that your steel tank doesn't. It's a sacrificial part designed to protect your heater from rust. However, as the standard magnesium or aluminum anode rod corrodes, it can release electrons that provide an energy source for those stinky sulfate-reducing bacteria.
If flushing and sanitizing didn't fix the rotten egg smell for good, replacing the old anode rod with a special aluminum-zinc one is often the permanent solution. The zinc in the alloy poisons the bacteria, preventing them from coming back.
Guide to Replacing Your Anode Rod:
This is a more advanced task, but it's manageable if you're comfortable with basic tools.
- Power Down: Turn off the power or gas to your water heater.
- Shut Off Water: Close the cold-water supply valve.
- Relieve Pressure: Open a nearby hot water faucet.
- Partially Drain: Connect a hose to the drain valve and drain just a few gallons of water to lower the water level below the top of the tank. Then close the valve.
- Locate the Rod: Look for a large hex head on top of your water heater. It might be exposed or under a plastic cap.
- Loosen the Rod: This is often the hardest part. You’ll need a socket wrench with a 1-1/16 inch socket and a long breaker bar for leverage. Turn it counter-clockwise. It may require significant force.
- Remove the Old Rod: Once loose, unscrew and lift the old rod out. Be prepared for it to look heavily corroded and pitted—that means it was doing its job!
- Install the New Rod: Insert the new aluminum-zinc anode rod. You may need a flexible, segmented rod if you have low overhead clearance.
- Tighten and Seal: Screw the new rod in by hand, then tighten it securely with the wrench.
- Return to Service: Close the hot water faucet, open the cold-water supply to refill the tank, and check for leaks around the new rod. Once full, restore power or gas.
After replacing the rod, your hot water should be permanently free of that rotten egg smell.
DIY Costs vs. Hiring a Professional
Fixing this issue yourself can save you a significant amount of money.
- DIY Costs:
- Descaling Solution (Vinegar): $5 - $10
- New Anode Rod: $30 - $60
- Socket Wrench (if you don't own one): $20 - $40
- Professional Service:
When to Call in the Experts
If you’ve tried these solutions and your water is still smelly or discolored, or if you're not comfortable performing any of these steps, it’s time to call a professional. There could be a more complex issue at play that requires an expert diagnosis.
And for all your home maintenance needs—from guided DIY repairs like this one to finding a trusted, vetted professional in your area—the Casa app is here to help. Download it today to take the stress out of homeownership and keep your home running smoothly.


