Is your morning shower less of a refreshing start and more of a frustrating trickle? You're not alone. A clogged, leaky, or just plain old shower head can ruin the experience. The good news is that you don't have to live with it. Replacing a shower head is one of the easiest and most affordable DIY projects you can tackle, and it can completely transform your daily routine.
In less than an hour, you can upgrade your bathroom, improve water pressure, and even save money on your water bill. Whether you're dealing with frustrating mineral buildup, a persistent drip, or you just want to give your bathroom a modern facelift, this guide is for you.
We'll walk you through everything you need to know, from picking the right tools to ensuring a perfect, leak-free installation. Let's get that old fixture out and your new one in!
Signs It’s Time to Replace Your Shower Head
Not sure if you need a replacement or just a good cleaning? Here are the tell-tale signs that it’s time for an upgrade:
- Low Water Pressure: If the flow has weakened over time, it's likely clogged with mineral deposits (limescale). While you can sometimes clean this, a new head often provides a much better and more permanent solution.
- Leaking or Dripping: A shower head that drips long after you've turned off the water isn't just annoying; it's a money drain. According to the EPA's WaterSense program, a shower head leaking at 10 drips per minute wastes more than 500 gallons of water per year. That's enough for 160 showers!
- Uneven or erratic Spray: Are jets of water shooting off in odd directions or not flowing at all? Clogged nozzles are to blame. A new shower head will restore that full, even spray you’ve been missing.
- Visible Mineral Buildup or Rust: If you see crusty, white limescale or orange rust stains on the nozzles or the connection, it’s a sign of aging. This buildup can harbor bacteria and is often impossible to fully remove.
- You Just Want an Upgrade: Sometimes, you just want something new. Modern shower heads offer amazing features like rainfall settings, handheld wands, and water-saving technology that can enhance your shower while lowering your utility bills.
Tools and Materials You'll Need
This project doesn’t require a trip to the hardware store for a cart full of tools. You likely have most of what you need already.
- Your new shower head (and any included parts like a handheld hose or mounting bracket)
- Adjustable wrench or channel-lock pliers
- Plumber’s tape (also known as Teflon tape)
- A soft cloth or old towel (to protect finishes and cover the drain)
- An old toothbrush
- White vinegar (for cleaning stubborn grime)
Your Step-by-Step Guide to Replacing a Shower Head
Ready to get started? We’ll break this down into simple, manageable steps. Just follow along, and you’ll be done in no time.
Step 1: Prepare Your Workspace
First things first, let’s get the area ready.
- Turn Off the Water: You don't need to shut off the main water supply for this job. Just make sure the shower faucet is turned completely off.
- Protect Your Tub and Drain: Lay an old towel over the shower drain. This is a pro tip! It will prevent any small parts (or your old shower head) from falling down the drain. It also protects your tub or shower floor from scratches if you drop a tool.
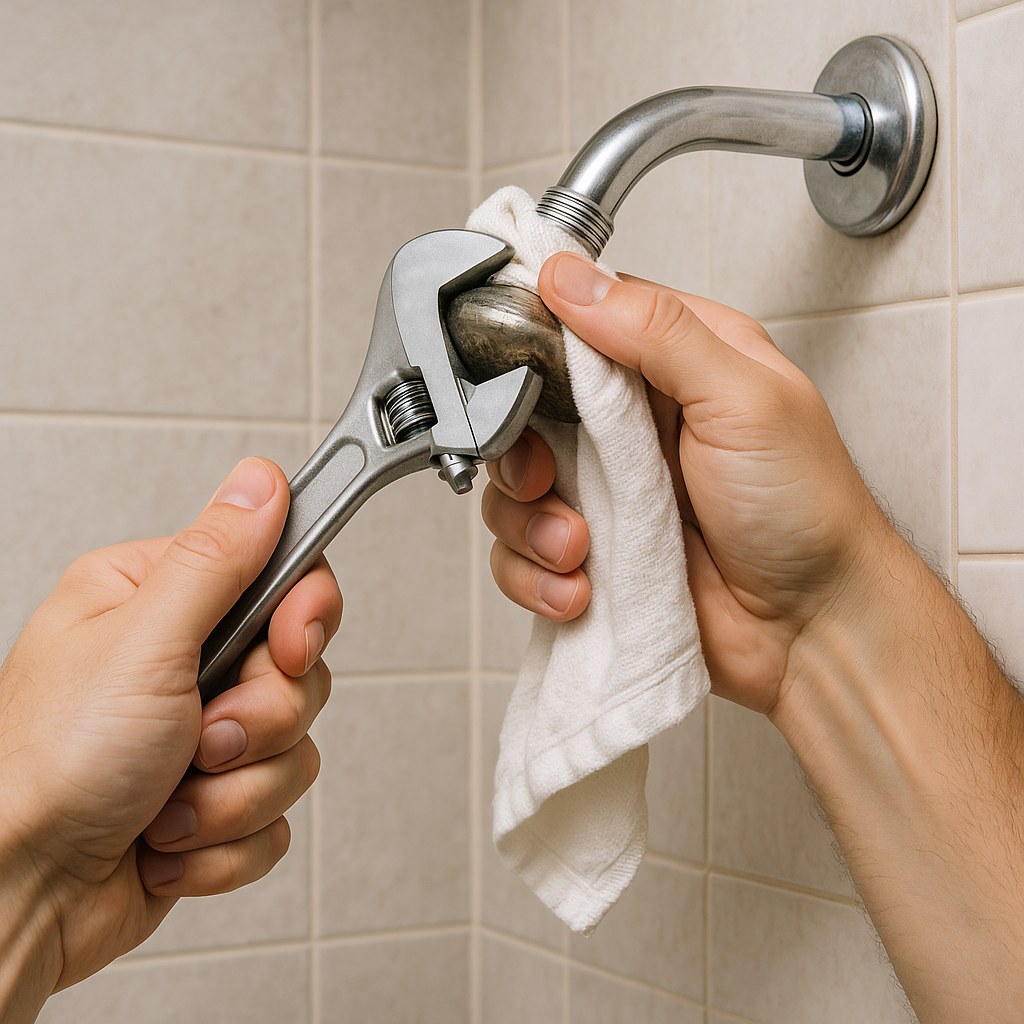
Step 2: Remove the Old Shower Head
Now, it’s time to say goodbye to the old fixture. Most of the time, this is straightforward.
- Try by Hand First: Grip the shower head firmly and try to turn it counter-clockwise. Sometimes, it’s loose enough to unscrew by hand.
- Bring in the Wrench: If it won't budge, grab your adjustable wrench. To avoid scratching the shower arm (the pipe coming out of the wall), wrap your soft cloth around the base of the shower head where it connects to the arm.
- Loosen and Remove: Grip the cloth-covered area with your wrench and turn it counter-clockwise. Once it's loose, you should be able to finish unscrewing it by hand. If you have a handheld unit, you'll be unscrewing the hose coupling from the shower arm instead of the head itself.
Step 3: Clean and Inspect the Shower Arm Threads
With the old head gone, you’ll see the threaded end of the shower arm. This is a crucial moment to ensure your new installation is successful.
- Remove Old Tape: Peel off any old plumber's tape from the threads.
- Clean the Threads: If you see any mineral buildup or gunk, now is the time to clean it. For stubborn deposits, you can use the vinegar trick: fill a small plastic bag with white vinegar, slide it over the arm so the threads are submerged, and secure it with a rubber band. Let it soak for 30 minutes, then remove the bag and scrub the threads clean with an old toothbrush.
- Inspect for Damage: Look closely at the threads. Are they straight, even, and free of rust or damage? In most cases, they'll be perfectly fine. If they are corroded or stripped, you'll need to replace the shower arm itself before proceeding.
Optional Step: Replacing the Shower Arm
If the arm is rusted, damaged, or you're upgrading to a rain shower head that requires a longer, overhead arm, you’ll need to replace it. Don’t worry, this is also a simple task.
- Unscrew the Old Arm: Wrap a cloth around the arm near the wall and use your wrench to turn it counter-clockwise. It will unscrew from a fitting inside the wall.
- Prepare the New Arm: Take your new shower arm and wrap plumber’s tape 3-4 times clockwise around the threads that go into the wall.
- Install the New Arm: Hand-tighten the new arm into the wall fitting, turning it clockwise. Once it's snug, use your wrench (with a cloth to protect the finish) to give it a final quarter-turn until it's tight and angled downward correctly.
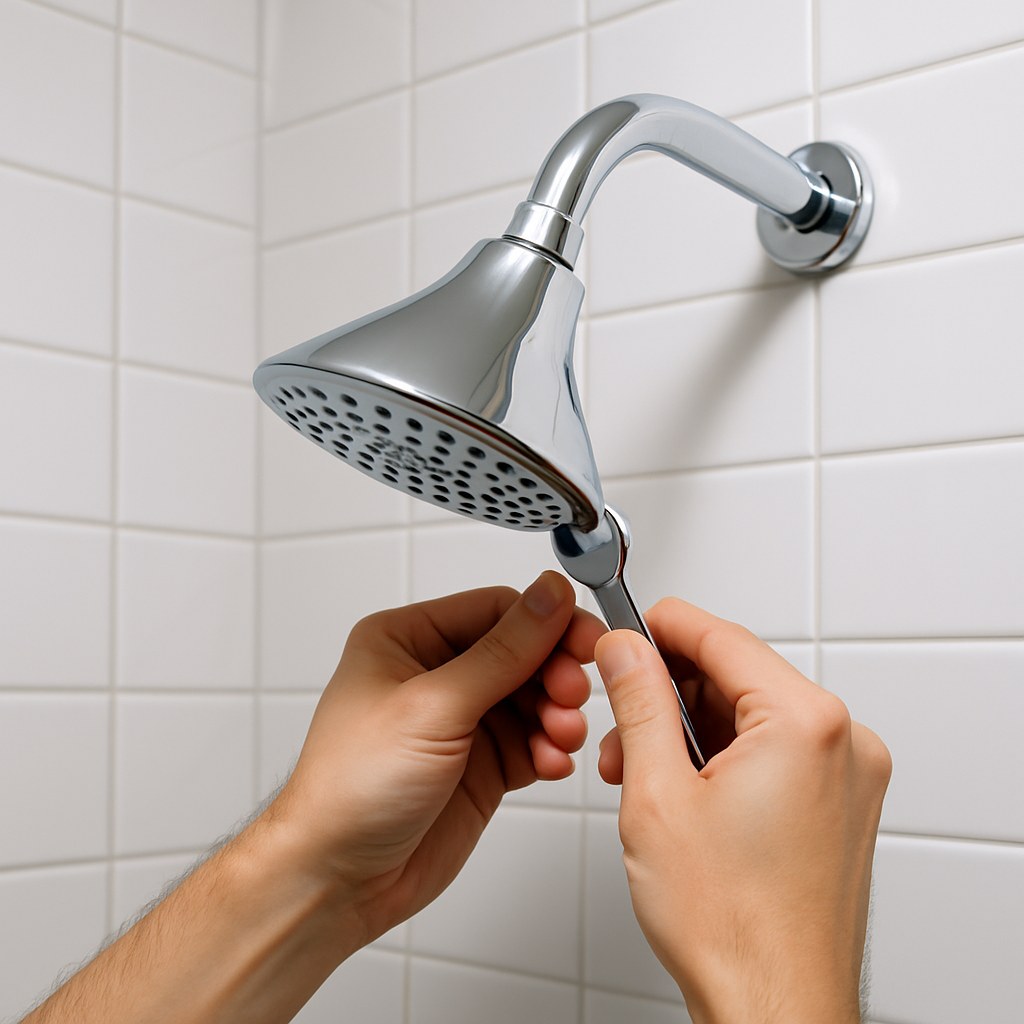
Step 4: Install Your New Shower Head
This is the exciting part! You're just a few moments away from a better shower.
- Apply New Plumber’s Tape: Take your roll of plumber’s tape and wrap it clockwise around the clean threads of the shower arm. Why clockwise? This ensures the tape tightens as you screw on the new head, instead of bunching up or unraveling. Three or four layers should be plenty.
- Attach the New Head:
- For a Fixed Head: Simply screw the new shower head onto the taped threads by hand, turning it clockwise until it's snug.
- For a Handheld Head: First, screw the mounting bracket onto the shower arm. Then, attach one end of the hose to the bracket and the other to the handheld shower head. Most of these connections are designed to be hand-tightened.
- Give It a Final Snug: Once hand-tight, use your wrench and cloth to give the connection a gentle quarter-turn. Be careful not to over-tighten, as this can crack the plastic fittings and cause leaks. Snug is good enough.
Step 5: Test for Leaks
It's the moment of truth.
- Turn on the Water: Slowly turn on the shower faucet and let the water run through the new head.
- Check the Connection: Look closely at where the new shower head connects to the shower arm. Do you see any drips or spraying water?
- Troubleshoot if Needed: If you see a small leak, turn the water off and use your wrench to tighten the connection just a tiny bit more. If it still leaks, you may need to unscrew it and re-apply the plumber's tape. If there are no leaks, you're done!

How Much Does It Cost to Replace a Shower Head?
This is one of the most budget-friendly home upgrades you can make.
- DIY Cost: The price of the shower head itself, which can range from $20 for a basic model to over $200 for a high-end spa system. Add about $2 for a roll of plumber's tape, and that's it!
- Professional Cost: If you'd rather hire a professional, a plumber will typically charge between $75 and $200 for a simple replacement, according to sources like Angi. By doing it yourself, you save on labor and gain a valuable home maintenance skill.
Enjoy Your New Shower!
Congratulations! You’ve successfully replaced your shower head and upgraded your entire bathroom experience. It’s a simple fix that makes a huge difference every single day.
For more easy-to-follow guides for common home repairs, expert maintenance tips, and a direct line to trusted professionals when you need them, download the Casa app today. We’re here to help you manage your home with confidence, one project at a time.


