There’s a unique kind of heartache that comes from discovering a fresh scratch on your beautiful floors. Whether it’s from a piece of furniture being dragged, a pet’s enthusiastic playtime, or a dropped object, that one mark can feel like it’s staring back at you every time you walk by.
The good news is that most floor scratches are fixable, and you often don't need to call in a professional to do it. With a little bit of know-how and the right tools, you can make those unsightly marks disappear. The secret is knowing what kind of floor you have and how deep the scratch really is.
In this complete guide, we'll walk you through everything you need to know about how to fix scratched floors. We’ll cover laminate, engineered wood, and solid hardwood, giving you step-by-step instructions for every level of damage. Let’s get those floors looking pristine again!
Step 1: Identify Your Flooring Material
Before you can fix the scratch, you have to know what you’re working with. Different flooring types require different repair methods. If you’re not sure what you have, don’t worry—it’s easy to figure out.
Here’s how to play detective with your floors:
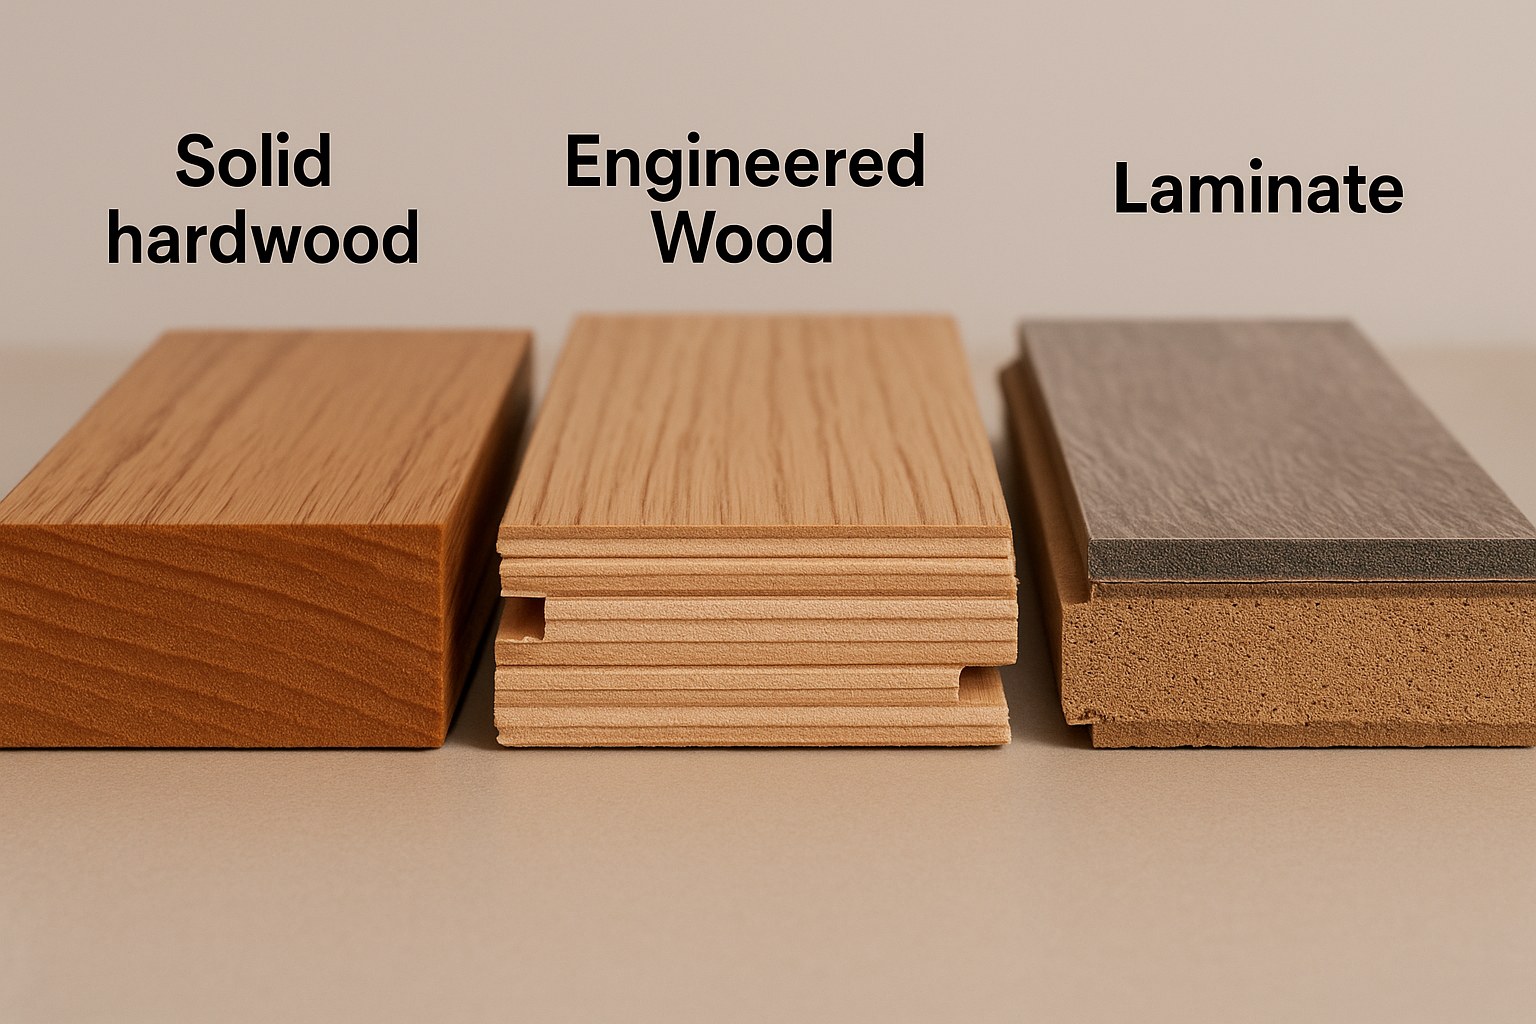
- Laminate Flooring: Laminate is a synthetic product designed to look like wood. Look closely at the planks. Do you see the same wood grain pattern repeating every few boards? That’s a tell-tale sign of laminate. If you can, lift an air vent cover or a threshold strip and look at a cross-section of a plank. Laminate has a fiberboard core with a printed image layer on top.
- Engineered Wood Flooring: Engineered wood looks and feels very much like solid hardwood because the top layer is real wood. The difference is what’s underneath. A cross-section will reveal a thin veneer of hardwood bonded to multiple layers of plywood or high-density fiberboard. This construction makes it more stable than solid wood but limits how many times it can be sanded.
- Solid Hardwood Flooring: This is the classic. Each plank is a single, solid piece of wood from top to bottom. A cross-section will show you solid wood with a consistent grain running through its entire thickness. It’s the most durable and can be refinished multiple times over its lifespan.
Once you’ve identified your floor type, you’re ready for the next step.
Step 2: Assess the Scratch Severity with the Fingernail Test
This might be the easiest diagnostic test in home repair. Simply run your fingernail gently across the scratch.
- If your nail doesn’t catch: Congratulations! You have a superficial scratch. This is usually just in the top finish or sealant layer and is the easiest type to fix.
- If your nail catches: This indicates a moderate to deep scratch that has penetrated the finish and likely gotten into the wood or image layer itself. This will require a bit more work, but it’s still very manageable.
Now that you know your floor type and scratch depth, let's dive into the specific repairs.
How to Fix Scratched Laminate Floors
Laminate can’t be sanded, so repairs focus on concealing or filling the damage.
For Superficial Scratches (Nail Doesn’t Catch)
For light scuffs, a simple repair marker is your best friend.
- Clean the Area: Wipe the scratch with a dry microfiber cloth to remove any dust or debris.
- Use a Repair Marker: Grab a laminate floor repair marker that closely matches your floor’s color. Shake it well.
- Color in the Scratch: Carefully draw over the scratch, following the direction of the faux grain.
- Buff It Out: Immediately wipe away any excess ink with a clean cloth and buff the area gently to blend it in.
For Moderate Scratches (Nail Catches)
If the scratch has gone through the top layer but hasn't exposed the light-colored core, a putty or wax kit is the way to go.
- Clean and Prep: Vacuum the scratch to remove any debris.
- Apply the Putty: Use a laminate floor repair kit, which typically comes with colored putty and a small spatula. Choose the color that matches your floor (you can often mix them).
- Fill the Scratch: Press the putty firmly into the scratch using the spatula, slightly overfilling it.
- Level the Surface: Scrape the flat edge of the spatula across the repair to remove the excess putty and make it level with the floor.
- Clean and Dry: Wipe away any residue around the scratch with a lightly damp cloth and let the putty cure according to the manufacturer's instructions.
For Deep Gouges (White Core is Visible)
When a scratch is so deep that it exposes the light-colored fiberboard core, filling it won't be enough. This is an advanced repair that involves replacing the entire plank. While it’s a bigger job, it’s still a DIY possibility if you’re feeling confident. It involves carefully cutting out the damaged plank and fitting a new one in its place using wood adhesive.
How to Fix Scratched Engineered and Solid Hardwood Floors
The process for real wood floors is similar for both engineered and solid hardwood, with the main difference being how deep you can go. First, you need to identify the finish.
The Water Test: Find an inconspicuous spot on your floor and place a single drop of water.
- If the water beads up for several minutes, you have a hard, modern finish like polyurethane.
- If the water soaks in quickly or leaves a dark spot, you likely have a softer, penetrating finish like oil or wax.
For Superficial Scratches on a Polyurethane Finish
- Clean the Board: Thoroughly clean the scratched board with a mild soap and water solution, then dry it completely.
- Use a Repair Marker or Stain Pen: Just like with laminate, a wood floor repair marker that matches your stain color can work wonders on light scratches. Color in the scratch, wipe the excess, and let it dry.
- Seal It: For added protection, you can apply a very thin coat of water-based polyurethane over the repair with a small artist’s brush. Feather the edges to blend it in.
For Superficial Scratches on an Oil or Wax Finish
These finishes are easier to spot-repair.
- Clean with Mineral Spirits: Dampen a cloth with mineral spirits and gently wipe the scratch to clean it.
- Use a Wax Stick: Rub a colored wax repair stick (matching your floor) into the scratch.
- Buff and Re-oil: Scrape off any excess wax and buff the area with a clean cloth. Then, apply a small amount of matching hardwax oil to a cloth and rub it into the repaired area to blend the sheen.
For Moderate to Deep Scratches in Wood
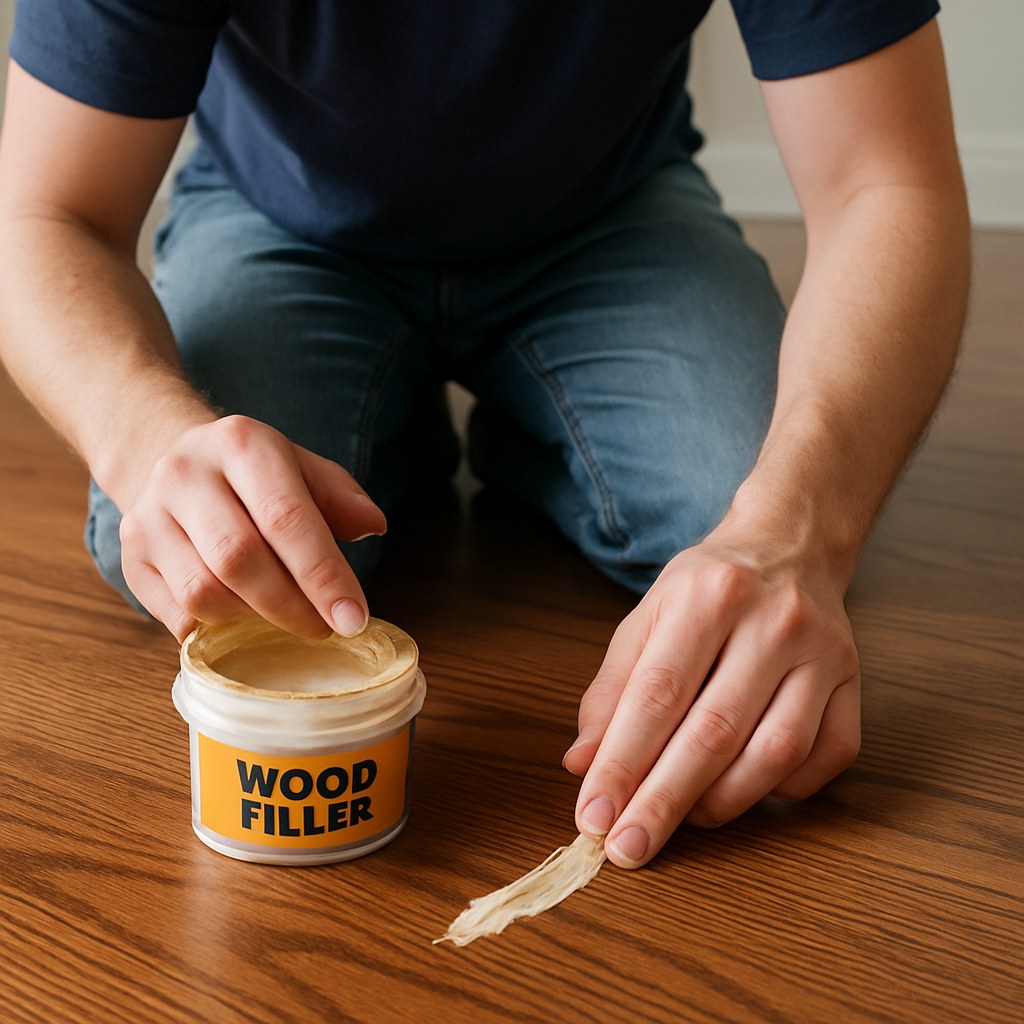
When your fingernail catches, it's time to bring out the wood filler.
- Sand the Scratch (Gently!): Using 180-grit sandpaper, lightly sand only inside the scratch. You’re just roughing it up so the filler will stick.
- Clean and Fill: Wipe away the dust. Apply a color-matched wood filler with a plastic putty knife, pressing it into the scratch.
- Scrape and Dry: Scrape the surface flat and allow the filler to dry completely.
- Final Sand and Seal: Lightly sand the filled area with 220-grit sandpaper until it’s perfectly smooth. Wipe away the dust and apply a matching finish (polyurethane or oil) to seal the repair.
When to Call a Professional
While DIY repairs are great for isolated scratches, some situations are best left to the pros:
- Widespread Scratches: If your entire floor is covered in scratches and looks worn out.
- Deep Gouges in Solid Hardwood: Extremely deep damage might require replacing a board, which can be tricky.
- Refinishing: If you have solid hardwood that's seen better days, refinishing the entire floor is a large, dusty, and challenging job.
According to Forbes Home, the average cost to professionally refinish hardwood floors is between $3 and $8 per square foot. While this is more expensive than a $15 repair kit, it can completely transform a room and add significant value to your home.
Take Control of Your Home Maintenance
Fixing a scratched floor is one of those satisfying DIY projects that makes a huge visual impact. By correctly identifying your flooring and the severity of the damage, you can choose the right method and restore your floor's beauty in an afternoon.
Feeling empowered? There's a world of home repair waiting for you. For more easy-to-follow guides, expert advice, and a direct line to trusted professionals for the jobs you don't want to tackle, download the Casa app today. Casa puts the power of home maintenance right in your pocket, so you can handle any issue that comes your way with confidence.


