That slight wobble or creak when you step on your deck stairs can be more than just a minor annoyance—it’s a safety warning. Loose deck stairs can be a serious hazard for you, your family, and your guests. Over time, exposure to the elements, combined with constant foot traffic, can cause fasteners to loosen, wood to weaken, and the entire structure to become unstable.
The good news? You don’t have to live with that feeling of uncertainty every time you go up or down. In many cases, fixing loose deck stairs is a straightforward DIY project that you can tackle in an afternoon with just a few basic tools.
Here at Casa, we believe in empowering you to handle your home maintenance with confidence. We’ll walk you through everything, just like a friendly expert over the phone. In this guide, we'll cover how to perform a safety check, diagnose the source of the looseness, and make the necessary repairs to get your stairs safe and solid again.

Why Are My Deck Stairs Loose? Common Causes
Before we grab our tools, let's understand what's likely causing the problem. Knowing the "why" helps you pinpoint the right "how."
- Loose Fasteners: This is the most common culprit. Wood naturally expands and contracts with changes in temperature and humidity. Over many seasons, this movement can cause screws and nails to work themselves loose.
- Wood Rot: Moisture is the enemy of any wooden outdoor structure. If water is allowed to pool or soak into the wood, it can lead to rot. Rotted wood becomes soft and spongy, losing its ability to hold fasteners securely.
- Age and Wear: Simply put, years of use take a toll. The constant weight and impact from people walking up and down the stairs will eventually lead to wear and tear on all components.
- Structural Issues: Sometimes, the problem goes deeper than a single step. The stringers (the sawtooth-shaped boards that support the steps) could be cracked, or the posts supporting the entire staircase could be compromised.
Step 1: Perform an Initial Safety Check
First things first: let's assess the situation safely. This initial check will help you determine if you're dealing with a simple fix or a more complex structural problem. Put on a pair of work gloves and let's get started.
- Walk the Stairs: Slowly and carefully walk up and down the staircase. Pay close attention to how each step feels under your feet. Does one specific step move, or does the entire structure feel like it's shifting?
- Look for Gaps: Stand back and look at the stairs from the front. Do you see any visible gaps between the stair treads (the part you step on), the risers (the vertical part), and the stringers (the support beams)?
- Check the Handrail: Grab the handrail and give it a gentle but firm shake. A wobbly handrail can also indicate that the posts it's attached to are loose.
After this quick 5-minute inspection, you should have a good idea of the scope of the problem. Is the looseness limited to just one or two steps, or does the whole staircase feel unstable?
Scenario 1: You've Found a Single Loose Step
If your safety check revealed that the problem is isolated to one or two steps, your fix is likely to be quick and easy. Let’s zoom in on the problem area.
Inspect the Fasteners and Wood Quality
Before you can tighten anything, you need to make sure the wood itself is still solid.
- Locate the Fasteners: Kneel beside the loose tread and find the screws or nails holding it to the stringers. You should see them on the top of the tread. You may also want to use a flashlight to look underneath the step for any hidden brackets or screws.
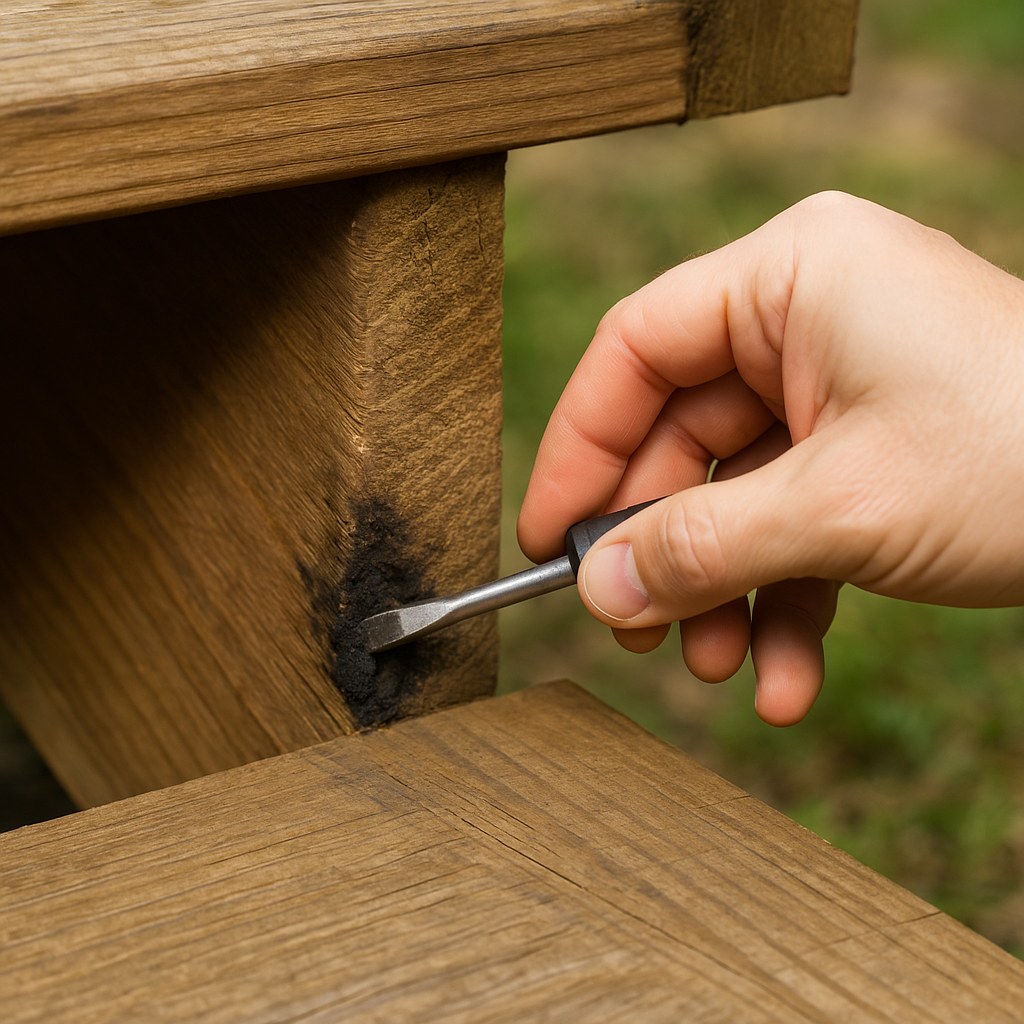
- Test for Wood Rot: This is a crucial test. Take a flathead screwdriver and firmly poke the wood around the fasteners and on the underside of the tread and stringer. Solid, healthy wood will be hard and resistant. If the screwdriver sinks in easily, or if the wood feels soft, dark, and crumbly, you have wood rot.
If you find significant rot, stop immediately. Rotted wood cannot be safely secured. This is a job for a professional deck contractor who can replace the damaged components.
Tighten or Replace the Fasteners
If the wood passed the screwdriver test, the fix is usually as simple as dealing with the fasteners.
- If the Fasteners are Loose but Usable: Grab your power drill and fit it with the correct driver bit for your screws. Drive each loose screw on the tread and riser until it's snug. Don't overtighten, as this can strip the wood. Once done, step firmly on the center of the tread to see if the wobble is gone.
- If the Fasteners are Rusty, Stripped, or Missing: It's time to replace them. Use a claw hammer or the back of a drill to remove the old, damaged fasteners. For a stronger hold, use new wood screws that are slightly longer and thicker than the old ones. Drill a new pilot hole next to the old one to prevent the wood from splitting, then drive the new screw in until it's secure.
After tightening or replacing the fasteners, test the step again. If it's solid, congratulations—you've fixed the issue!
Scenario 2: The Entire Staircase is Loose
If your initial safety check made you feel like the whole structure was shifting, the problem is more widespread. This requires a more thorough inspection and a more comprehensive approach to re-securing the stairs.
Inspect the Overall Stair Structure
- Examine the Stringers: Stand to the side of the staircase and look closely at the stringers. These are the backbone of your stairs. Look for any long cracks, splits, or signs of sagging.
- Check the Underside: Get your flashlight and carefully inspect the entire underside of the staircase. Look for any dark, soft, or discolored patches of wood that could indicate rot. Use your screwdriver to test any suspicious areas.
- Inspect Support Posts and Beams: Look where the stringers attach to the deck at the top and where they meet the ground or a concrete pad at the bottom. Are these connections solid? Are the posts themselves rotted or damaged?
If you discover cracked stringers, significant rot, or damage to the main support posts, this is a major structural problem that affects the safety of your entire deck. It's time to call a professional.
How to Re-Secure Multiple Stair Steps
If the main structure and wood appear to be sound, you can proceed with tightening everything up. The goal is to work methodically from the bottom to the top.
- Tighten All Treads and Risers: Starting with the bottom step, use your drill to tighten every accessible screw on each tread and riser.
- Replace Bad Fasteners: As you go, replace any screws that are missing, severely rusted, or stripped.
- Check Brackets and Hangers: Look underneath where the stringers connect to the deck frame. These are often secured with metal hangers or brackets. Ensure the bolts or screws holding these connections are tight.
- Final Test: Once you've gone over the entire staircase, walk up and down it a few times. It should feel significantly more stable and secure.
When You Should Call a Deck Contractor
While many deck stair issues are perfect for a DIY weekend warrior, some problems are best left to the pros. Your safety is the top priority. Call a professional if you encounter:
- Widespread Wood Rot: Small spots can sometimes be repaired, but if the rot is extensive, the wood needs to be replaced.
- Cracked or Broken Stringers: This is a critical structural failure.
- Loose or Rotted Support Posts: The foundation of your stairs is compromised.
- The Stairs Are Still Loose After Your Fix: If you've tightened everything and the stairs still feel unsafe, there's a deeper issue that an expert needs to diagnose.
According to Angi, hiring a professional for deck repair can range from $200 for minor fixes to over $2,500 for major structural work. While it's an investment, it guarantees the job is done correctly and safely.
Your Deck Stairs are Secure—Now What?
Fixing your loose deck stairs is a huge win for your home's safety and your peace of mind. By tackling this project, you've not only prevented a potential accident but also extended the life of your deck.
Remember, regular maintenance is key. Inspect your deck and stairs at least twice a year, especially after winter, to catch small problems before they become big ones. Keep them clean and properly sealed to protect against moisture damage.
For every home maintenance challenge, from simple DIY fixes like this to knowing when to call in the pros, Casa is here to help. Download the Casa app today to get personalized maintenance reminders, access more step-by-step guides, and connect with a network of trusted home service professionals right from your phone. Let’s keep your home safe, one project at a time.


