Your chimney stands guard over your home day in and day out, battling rain, snow, wind, and sun. While it might seem indestructible, the very top of your chimney is its most vulnerable point. A cracked crown, a rusted-out cap, or crumbling mortar isn't just a cosmetic issue—it’s an open door for water to invade your home, leading to costly and stressful repairs down the line.
The good news is that you don't have to be a master mason to tackle common chimney top problems. With a strong focus on safety and a little bit of guidance, you can diagnose and fix many of these issues yourself, saving hundreds or even thousands of dollars.
So, if you’ve noticed some wear and tear on your chimney, don’t panic. Let’s walk through this together. This guide will help you understand the damage, what it means for your home, and how to fix it like a pro.
Why You Can't Ignore a Damaged Chimney Top
Think of your chimney top as the roof of your chimney system. Its job is to keep water out. When it fails, water becomes your home's worst enemy. According to the Chimney Safety Institute of America (CSIA), water penetration is the single greatest threat to a masonry chimney.
Here’s what can happen when water gets in:
- Damaged Flue Liner: Water can erode the clay tiles that line your flue, creating cracks that could allow heat and embers to escape into your home’s framework, posing a serious fire hazard.
- Rusted Damper and Firebox: Moisture can cause the metal components inside your fireplace, like the damper, to rust and seize up, rendering them useless.
- Interior Water Damage: Water can travel down the chimney structure and stain your ceilings and walls, promote mold growth, and even rot the wooden frame of your house.
- Structural Damage: In colder climates, water that seeps into the bricks and mortar can freeze and expand—a process called the "freeze-thaw cycle." This can cause bricks to crack and pop out, compromising the entire chimney structure.
Fixing these secondary issues is far more expensive than maintaining the chimney top. A little proactive repair work now can prevent a major headache later.
Safety First: A Crucial Warning Before You Begin
Before we talk about any repairs, let's talk about safety. This job involves working at height on a roof, which is inherently dangerous. Your safety is the number one priority.
Do not attempt this repair if:
- You are not comfortable with heights.
- The roof is steep, wet, icy, or covered in debris.
- It is a windy day.
- You do not have the proper safety equipment.
If you have any doubts, stop and call a professional. It’s not worth risking a serious injury.
If you do proceed, you absolutely must use the right safety gear:
- A Sturdy Extension Ladder: Make sure it’s placed on level ground and extends at least three feet above the roofline.
- A Roof Safety Harness: This is non-negotiable. Secure the harness to a proper anchor point on the roof.
- Non-Slip Footwear: Wear boots or shoes with excellent grip.
- A Spotter: Always have someone on the ground who can hold the ladder and be there in case of an emergency.
Step 1: Your Roof-Level Chimney Inspection
Once you are safely on the roof, it’s time to play detective. You’re looking for specific signs of wear and tear. Here’s how to conduct a thorough inspection:
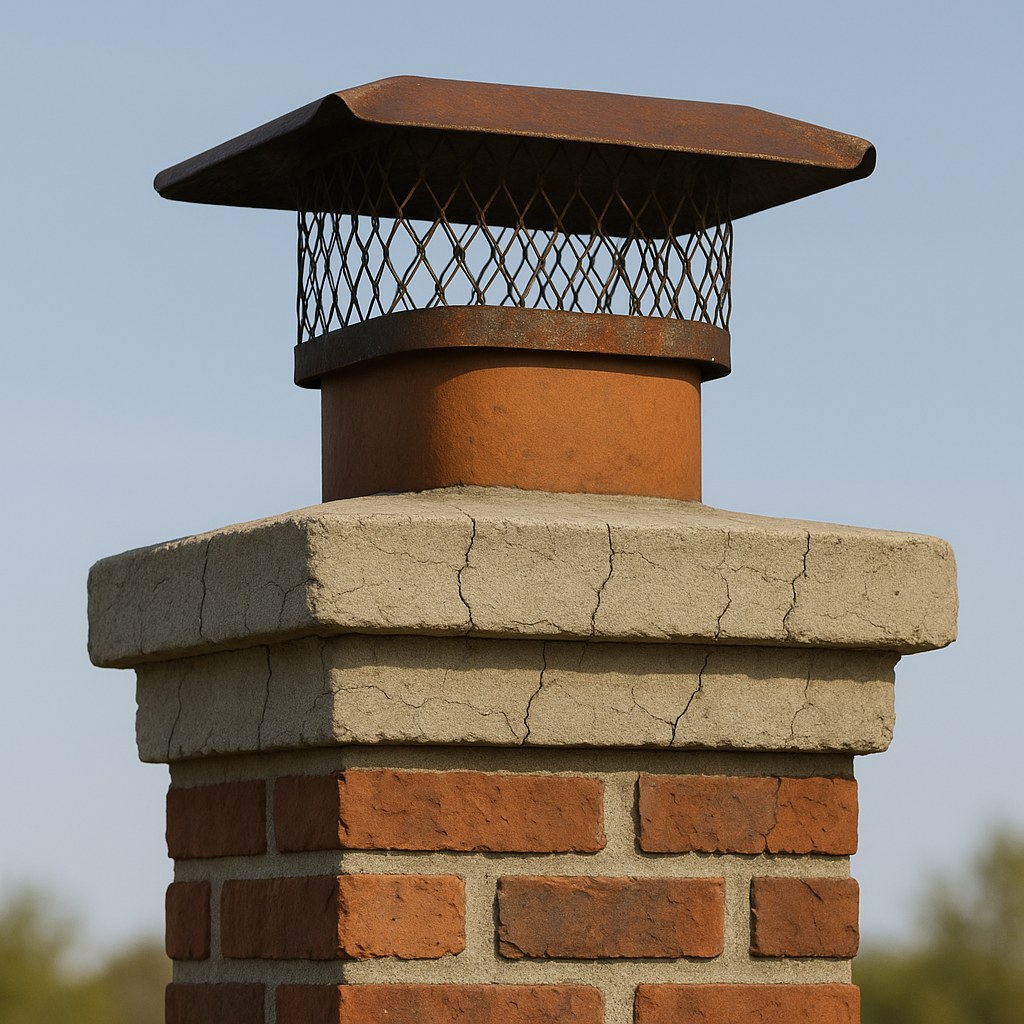
- Examine the Chimney Cap: This is the metal cover right at the top. Is it rusted, bent, or loose? Are the screws that hold it in place missing or corroded? A damaged cap can’t keep rain and animals out of your flue.
- Inspect the Chimney Crown: The crown is the concrete or mortar slab that covers the top of the brick structure. Look for cracks, from hairline fissures to larger chunks that are missing. Weeds growing out of the crown are a sure sign that water has been sitting there for a while.
- Tap the Crown: Gently tap the surface of the crown with a rubber mallet. A solid, satisfying "thud" means it's likely in good shape. If you hear a hollow "thump," it could indicate that water has gotten underneath and created voids, weakening the structure.
- Check the Mortar Joints: Look closely at the mortar between the top few rows of bricks. Is it crumbling, sandy, or receding back from the face of the brick? Use a screwdriver to gently poke at any suspect areas. If the mortar easily flakes away, it needs repair.
- Look for Loose Bricks: Gently push on the bricks at the top of the chimney. If anything wiggles, you have a structural problem that needs immediate attention from a professional mason.

Step 2: To DIY or Not to DIY? Diagnosing the Damage
After your inspection, you’ll have a better idea of what you’re dealing with. Now you need to decide if this is a job you can handle.
Call a professional chimney mason or roofer if you see:
- Large, deep cracks in the chimney crown (more than 1/8 inch wide).
- Missing chunks of the crown or missing bricks.
- Any loose or wobbly bricks.
- A chimney that appears to be leaning.
- Mortar damage that is more than ½-inch deep.
These are signs of serious structural issues that are beyond the scope of a simple DIY fix.
You can likely handle the repair yourself if the damage is limited to:
- A bent, rusty, or detached (but still present) metal chimney cap.
- Hairline or spider-web cracks on the chimney crown surface.
- Shallow crumbling in the mortar joints (less than ½-inch deep).
If your issues fall into the DIY category, let’s get to fixing them!
DIY Chimney Top Repair Guides
Here are the step-by-step instructions for the three most common chimney top repairs.
How to Replace a Metal Chimney Cap
- Difficulty: Moderate
- Time: 1 Hour
A chimney cap is your first line of defense. Replacing a damaged one is a quick and highly effective fix.
You'll Need:
- Tape Measure
- New Metal Chimney Cap (stainless steel or copper is best)
- Work Gloves & Safety Glasses
- Adjustable Wrench or Screwdriver
- Masonry Brush
Steps:
- Measure Up: Before you do anything else, measure the length and width of the flue tile (the clay pipe sticking out of the top of the chimney). Write these dimensions down. You'll need them to buy a new cap that fits perfectly.
- Buy the Right Cap: Head to your local hardware or home improvement store to purchase a new cap. Choose one made from a rust-resistant material like stainless steel.
- Remove the Old Cap: Put on your gloves and safety glasses. Most caps are held on by four screws at the corners or a clamp around the base. Use your wrench or screwdriver to loosen them. Lift the old cap straight up and off the flue.
- Clean the Surface: Use your masonry brush to sweep away any loose debris, leaves, or old mortar from the top of the flue tile. This will ensure the new cap sits flush.
- Install the New Cap: Position the new cap over the flue, making sure its skirt overlaps evenly on all sides. Tighten the screws or clamp until the cap is snug.
- The Tug Test: Give the cap a gentle tug on all sides to confirm it’s secure and doesn’t wiggle. A firm fit is crucial to withstand high winds.
How to Reseal a Cracked Chimney Crown
- Difficulty: Moderate
- Time: 1 Hour (plus 24 hours to cure)
Sealing small cracks in the crown stops water from getting into the masonry and causing bigger problems.
You'll Need:
- Masonry Brush
- Polyurethane Chimney Crown Sealant
- Caulk Gun
- Paintbrush (one you don't mind throwing away)
- Paper Towels
Steps:
- Check the Forecast: You need a 24-hour window with no rain for the sealant to cure properly.
- Clean the Crown: Use the masonry brush to aggressively scrub away all dust, moss, and loose debris. A clean, dry surface is essential for good adhesion.
- Fill Wider Cracks: If you have any cracks wider than a hairline, use your caulk gun to fill them with the sealant. Smooth the bead of sealant with a damp paper towel so it’s level with the rest of the crown.
- Apply the Sealant: Pour a generous amount of sealant onto the crown. Using your paintbrush, spread it evenly across the entire surface, like you’re icing a cake.
- Get Full Coverage: Aim for a consistent coating about 1/8-inch thick. Make sure you brush the sealant over the edges of the crown by about an inch to create a waterproof drip edge.
- Let It Cure: Leave the sealant to cure for at least 24 hours, or as directed by the manufacturer, before it’s exposed to rain.
How to Repoint Chimney Mortar Joints
- Difficulty: Hard
- Time: 2-3 Hours
This process, also known as tuckpointing, is the most advanced of the three. It involves removing old, failing mortar and replacing it with new.
You'll Need:
- Gloves, Safety Glasses & Dust Mask
- Masonry Chisel & Hammer
- Masonry Brush
- Premixed Mortar Repair Compound
- Pointing Trowel
- Spray Bottle with Water
- Damp Sponge
Steps:
- Gear Up: Mortar dust can be harmful, so wear your mask, glasses, and gloves.
- Rake the Joints: Use the chisel and hammer to carefully chip out the loose, crumbling mortar from the damaged joints. Only go about ½-inch deep. Be careful not to damage the bricks themselves.
- Clean Out Debris: Use your masonry brush to thoroughly sweep all the dust and debris out of the cleaned joints.
- Dampen the Area: Lightly mist the joints and surrounding bricks with your spray bottle. This prevents the dry bricks from sucking the moisture out of the new mortar too quickly, which ensures a stronger bond.
- Mix the Mortar: Mix a small batch of the mortar repair compound according to the package directions until it has a peanut-butter-like consistency.
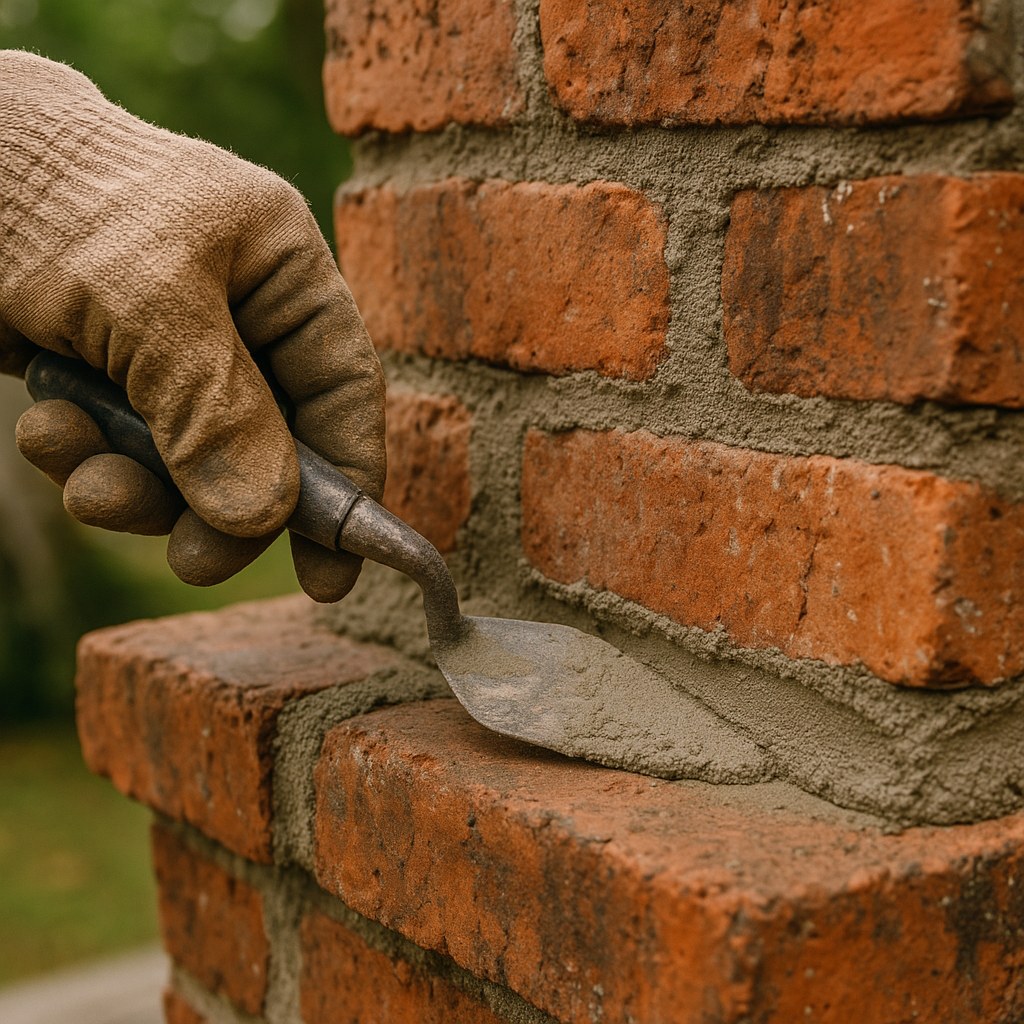
- Pack the Joints: Load some mortar onto your pointing trowel and press it firmly into the prepared joints. Apply it in thin layers until the joint is filled and flush with the brickwork.
- Strike the Joint: To create a professional look and help shed water, "strike" the joint by running the edge of your trowel along it to match the shape of the existing mortar joints.
- Clean Up: Use a damp sponge to carefully wipe any excess mortar off the faces of the bricks before it dries.
- Cure Slowly: After about an hour, lightly mist the new mortar with water to help it cure slowly and prevent cracking.
DIY vs. Hiring a Professional: A Cost Breakdown
One of the biggest motivations for DIY is cost savings. Here's a rough idea of what you can expect:
- DIY Chimney Cap Replacement: A new cap costs $50 - $150. Total DIY cost is under $150.
- DIY Crown Sealing: A bucket of crown sealant costs $50 - $100. Total DIY cost is under $100.
- DIY Repointing: A bag of mortar mix is about $10 - $20. Tools might add another $30. Total DIY cost is under $50.
Now, compare that to professional costs, which according to HomeAdvisor, can be:
- Professional Chimney Cap Installation: $200 - $700
- Professional Crown Repair/Sealing: $300 - $1,500
- Professional Repointing (Tuckpointing): $500 - $2,500+, depending on the extent of the damage.
The savings are significant, but remember to factor in the value of your time and your safety.
Keep Your Home Safe with Casa
Taking care of your chimney top is a vital piece of home maintenance that protects your entire home. By performing regular inspections and tackling minor repairs early, you can prevent major damage and keep your fireplace system operating safely for years to come.
If you’ve climbed on your roof and found that the job is bigger than you’re comfortable with, don’t hesitate to call in an expert. For jobs big and small, the Casa app is here to help. Download the Casa app today to get connected with trusted, certified local roofers and chimney specialists in your area. We make home maintenance easy, whether you're a seasoned DIYer or looking for a helping hand.


