
Dec 5, 2025
How to Fix a Loose Circuit Breaker A DIY Guide
A loose or wobbly circuit breaker is a serious fire hazard. This guide walks you through the essential safety precautions, how to diagnose the problem, and when you can safely fix it yourself versus when you must call a licensed electrician.
There are few home maintenance issues more unsettling than discovering a problem in your electrical panel. If you've noticed a circuit breaker that feels wobbly, loose, or just doesn't seem right, your concern is justified. A loose circuit breaker isn't just a minor annoyance; it's a potential fire hazard that needs to be addressed immediately.
Looking for more guidance? Take a look at our Repairs overview.
The connection between a circuit breaker and the panel's bus bar is critical. When it's loose, it can lead to electrical arcing—tiny, high-temperature sparks that jump the gap. This arcing generates intense heat, which can melt the breaker, damage the panel, and even ignite a fire.
The good news is that sometimes the fix is simple. The better news is that you've found a guide that will walk you through how to diagnose the issue safely. We'll help you determine if this is a simple reseating job you can handle yourself or a more complex problem that requires a professional electrician.
A Crucial Warning Before You Begin: Safety First
Before we go any further, let's be crystal clear: working inside an electrical panel is extremely dangerous and can be fatal if not done correctly. Even when you turn off the main breaker, the large service lugs where the main power lines enter the panel are always live. Touching them can cause severe electrical shock or death.
Do not proceed if you:
- Are not completely comfortable with the steps below.
- See any signs of burning, melting, or corrosion in your panel.
- Have an older electrical panel (e.g., Federal Pacific, Zinsco) known for safety issues.
If you have any doubt at all, stop what you are doing and call a licensed electrician. Your safety is not worth the risk.
Step 1: Prepare for a Safe Inspection
Your first goal is to get a clear look inside the panel without touching anything conductive. This requires careful preparation.
Tools and Gear You'll Need:
- Safety glasses
- Insulated work gloves (rated for electrical work is best)
- Phillips or flathead screwdriver (depending on your panel screws)
- A non-contact voltage tester
- A bright flashlight
Procedure:
- Ensure a Safe Environment: Stand on a dry surface. Never work on an electrical panel in a damp or wet area.
- Turn Off All Power: Locate the main breaker (usually the largest one at the top or bottom of the panel) and switch it to the "OFF" position. This will cut power to all the individual circuits, but remember, the main lugs at the top remain live.
- Verify Power is Off: Use your non-contact voltage tester to touch the metal panel cover and its screws. It should not light up or beep. This confirms the cover itself is not energized.
- Remove the Panel Cover: Carefully unscrew the screws holding the panel cover in place. With both hands, lift the cover straight off and set it aside.
Now, with the cover off, use your flashlight to perform a thorough visual inspection from a safe distance. Do not touch anything inside.
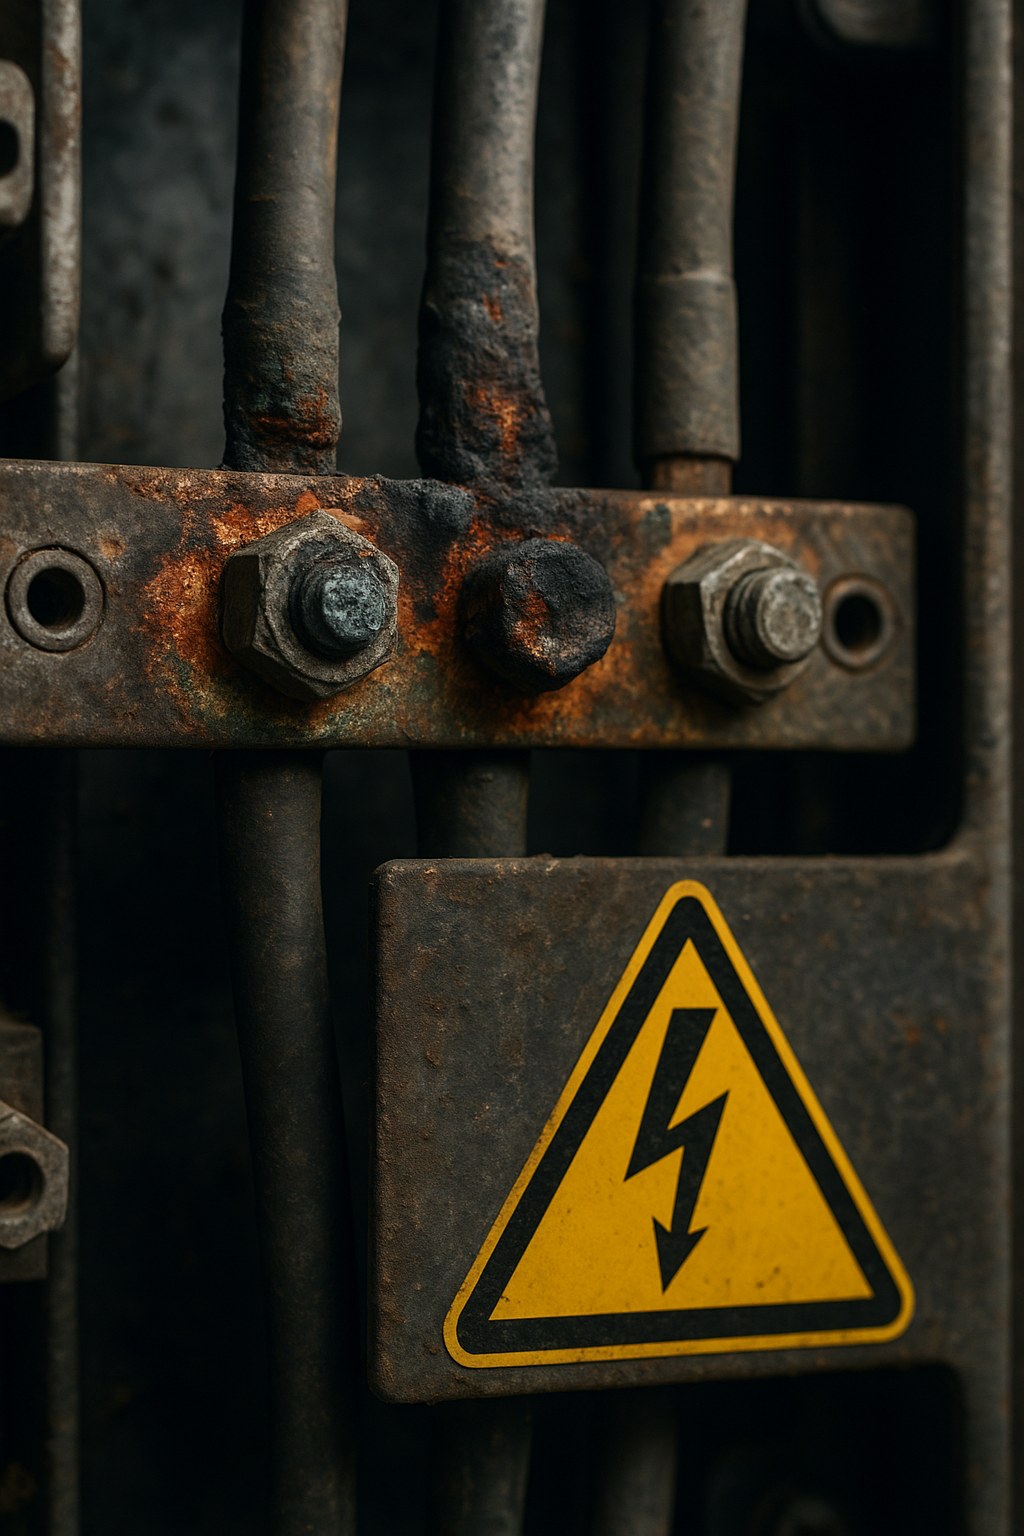
Look for any of these immediate red flags:
- Dark burn marks or soot on or around any breakers.
- Melting or discolored plastic on the breakers.
- Corrosion or rust on the metal bus bars (the fins the breakers connect to).
- A distinct smell of burnt plastic.
If you see any of these signs, the problem is beyond a simple loose breaker. Put the cover back on and call a licensed electrician immediately. These are symptoms of a more serious issue like sustained arcing or overheating.
Step 2: Confirm if the Looseness is Abnormal
With the main power off, it's safe to touch the plastic handles of the circuit breakers. Some breakers have a small amount of natural "play" or wiggle room. Your task is to determine if your breaker's movement is excessive.
- Gently wiggle the suspect breaker from side to side.
- Now, wiggle a few of its direct neighbors with the same amount of pressure.
Does the breaker in question move significantly more than the others? If the movement is comparable, what you're feeling is likely normal for your panel. You can safely reinstall the cover and restore power. However, if it's noticeably looser, it's time to investigate further.
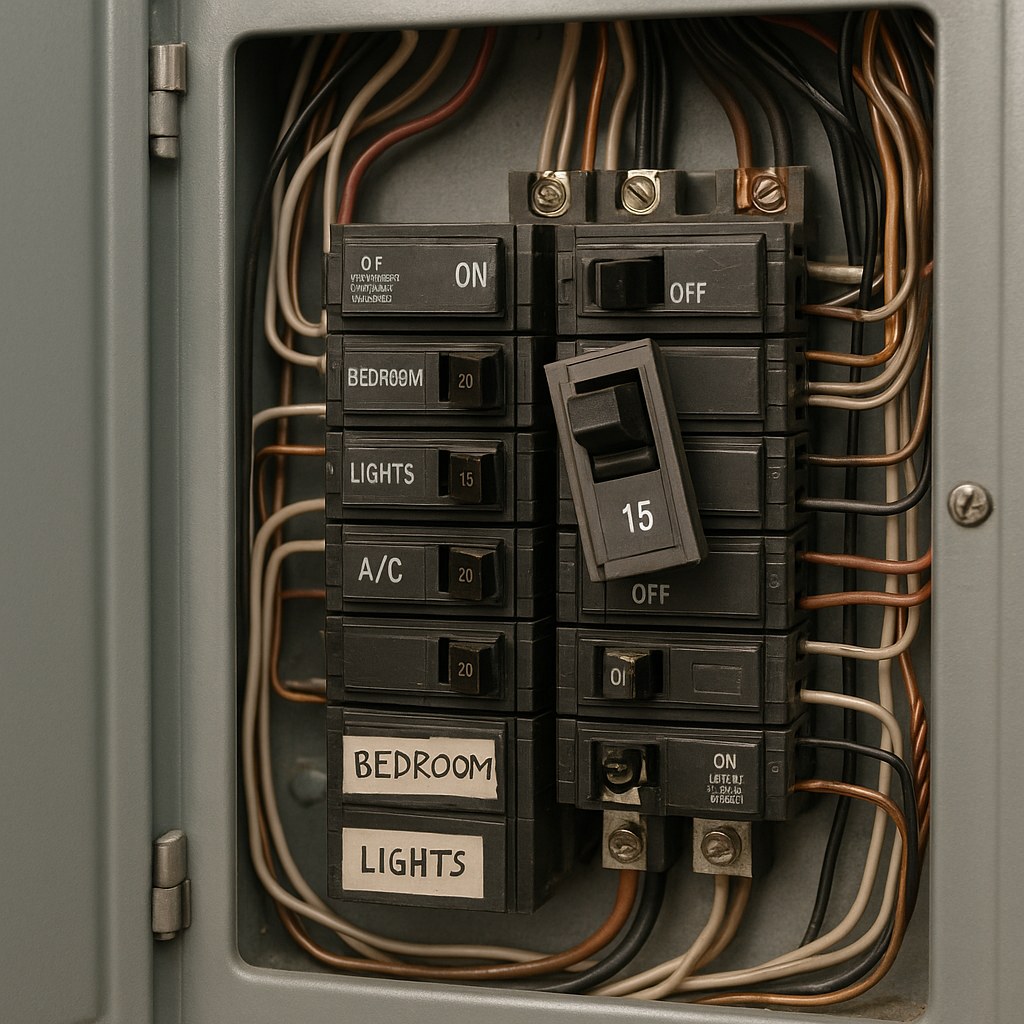
Step 3: Identify Your Breaker Type
There are two primary ways a breaker connects to the panel:
- Snap-in (or Plug-on) Breakers: These are the most common in modern homes. They have clips that snap directly onto the bus bar.
- Bolt-on Breakers: These are physically secured to the bus bar with a screw. You will see the screw head on the face of the breaker. These are more common in commercial applications but are found in some residential panels.
Look closely at your loose breaker. If you see a mounting screw, it's a bolt-on. If not, it's a snap-in. This distinction is key for the next step.
Step 4: The Simple Fix - Attempting to Reseat the Breaker
Often, a loose breaker simply wasn't installed correctly or has shifted over time. Reseating it can solve the problem.
For a Snap-in Breaker: With the main breaker still off, place your thumb on the outer edge of the loose breaker (the side away from the center of the panel). Press it firmly toward the back of the panel. You should feel or hear a solid "click" as it seats properly onto the bus bar. Wiggle it again; the looseness should be gone.
For a Bolt-on Breaker: Using the appropriate screwdriver, turn the mounting screw clockwise until it is snug. Do not overtighten it, as this can crack the breaker's housing. Wiggle the breaker again to confirm it is now firm.
If either of these steps worked, you've likely fixed the problem! You can now proceed to the final step of restoring power. If the breaker is still loose, it's likely that the breaker's mounting clips (on a snap-in model) or the bus bar itself is damaged. This means the breaker must be replaced.
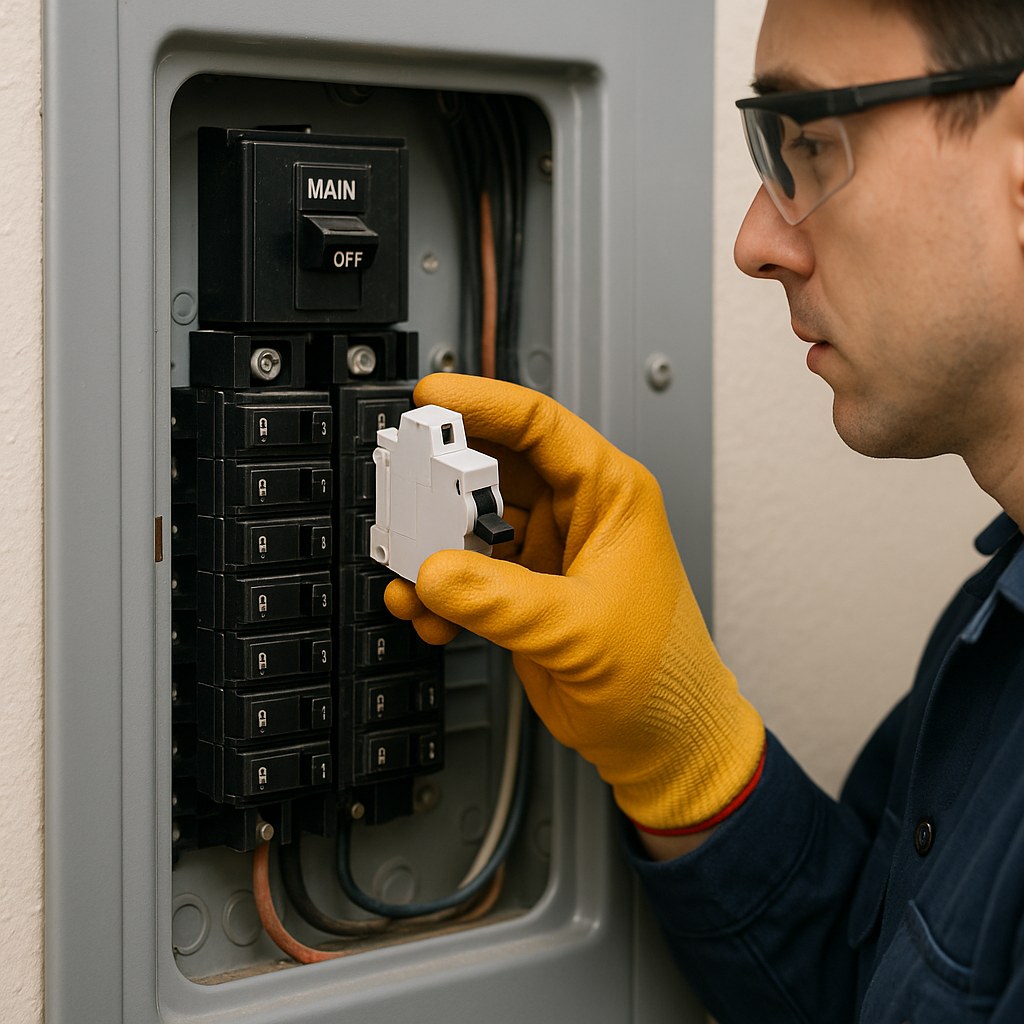
Step 5: How to Replace a Loose Circuit Breaker
If reseating didn't work, replacement is your next option. This is an advanced DIY task. If you've felt uncomfortable at any point so far, this is your final off-ramp to call a professional.
Purchasing the Correct Breaker
This is the most critical part of the replacement. Installing the wrong breaker is a code violation and a serious fire hazard. According to the National Electrical Code (NEC), you must use breakers specifically listed and classified for your panel.
To get the right one:
- Find the Panel Label: Look for a sticker on the inside of the panel door. Write down the manufacturer's name (e.g., Square D, Eaton, Siemens) and the model number.
- Note the Breaker Specs: Look at the old breaker and write down its amperage (e.g., 15A, 20A, 30A), type (single-pole, double-pole, GFCI/AFCI), and connection style (snap-in or bolt-on).
- Take a Picture: A photo of the old breaker and the panel label is invaluable.
- Go to a Hardware Store: Take this information (and the photos) to a reputable hardware store or electrical supply house and ask for an exact replacement that is approved for your panel model. Do not accept a "universal" or different brand unless it is explicitly listed as a compatible replacement on your panel's label.
The Replacement Process (Main Breaker OFF!)
- Remove the Old Breaker:
- Snap-in: Grasp the breaker and pull the outer edge away from the center of the panel. It should rock outward and release from the bus bar.
- Bolt-on: Completely loosen the mounting screw, then pull the breaker straight out.
- Disconnect the Wire: Loosen the terminal screw on the breaker where the circuit wire is connected and pull the wire out.
- Connect the New Breaker: Insert the circuit wire into the terminal on the new breaker and tighten the screw firmly. Give the wire a gentle tug to ensure it's secure.
- Install the New Breaker:
- Snap-in: Hook the inner side of the breaker onto the panel rail, then rock the outer side down firmly onto the bus bar until it clicks.
- Bolt-on: Push the breaker straight onto the bus bar and tighten the mounting screw until snug.
- Final Check: Gently wiggle the new breaker. It should feel solid and secure.
Step 6: Restoring Power and Testing
- Replace the Panel Cover: Carefully place the cover back on and secure it with all its screws.
- Restore Power: First, switch the main breaker back to the "ON" position. Then, flip the newly installed breaker to "ON."
- Listen and Look: Listen for any buzzing or sizzling sounds. If you hear anything unusual, immediately turn the breaker and the main off and call an electrician.
- Test the Circuit: Go to the area of your home powered by that circuit and turn on a light or plug in a small lamp. If it works normally and the breaker doesn't trip, you have successfully fixed the issue.
Cost Breakdown: DIY vs. Professional
Fixing a loose breaker can be very cost-effective if you can safely do it yourself.
- DIY Cost: The only cost is the replacement breaker. A standard single-pole breaker typically costs $5 - $15. A more complex GFCI or AFCI breaker can cost $40 - $60.
- Professional Cost: Hiring an electrician involves a service call fee and labor. According to HomeAdvisor, replacing a single circuit breaker typically costs between $100 and $250. This cost ensures the job is done safely and correctly, providing peace of mind.
Final Thoughts
Tackling a loose circuit breaker is a job that demands respect for the power you're dealing with. By following these steps cautiously, you can safely diagnose and often fix the problem yourself. However, the golden rule of electrical work always applies: when in doubt, call a pro.
For more expert home maintenance guides, personalized reminders, and a direct line to vetted professionals in your area, download the Casa app today. We're here to give you the confidence to manage your home, whether you're handling it yourself or need to call in for backup.