Seeing a mangled section of your gutter guard can be concerning, but it’s a common issue for homeowners. Addressing it promptly is important to prevent clogged gutters, which can lead to water overflowing and potentially damaging your roof, siding, or foundation.
The good news is that minor repairs are often straightforward and manageable for a homeowner with the right safety precautions. This guide will walk you through how to inspect the damage, identify what you’re working with, and decide whether it’s a job you can handle or one that’s best left to a professional.
What Damaged Gutter Guards Look Like
Before you get on a ladder, it helps to know what you’re looking for. Common signs of trouble include:
- Bent or Missing Sections: This is the most obvious sign of damage, often caused by impact from a ladder or falling debris.
- Clogged Gutters or Downspouts: If you see water spilling over the side of your gutters during a rainstorm, it means the guards are no longer doing their job. Debris may have gotten through a damaged section or is sitting on top, blocking water flow.
- Warped or Loose Panels: Plastic guards can warp in the sun over time, and any type of guard can become loose, creating gaps for leaves to enter.
- Visible Rust or Corrosion: For metal guards, rust spots indicate that the protective coating has worn away and the material is starting to fail.
How to Safely Inspect and Repair Gutter Guards
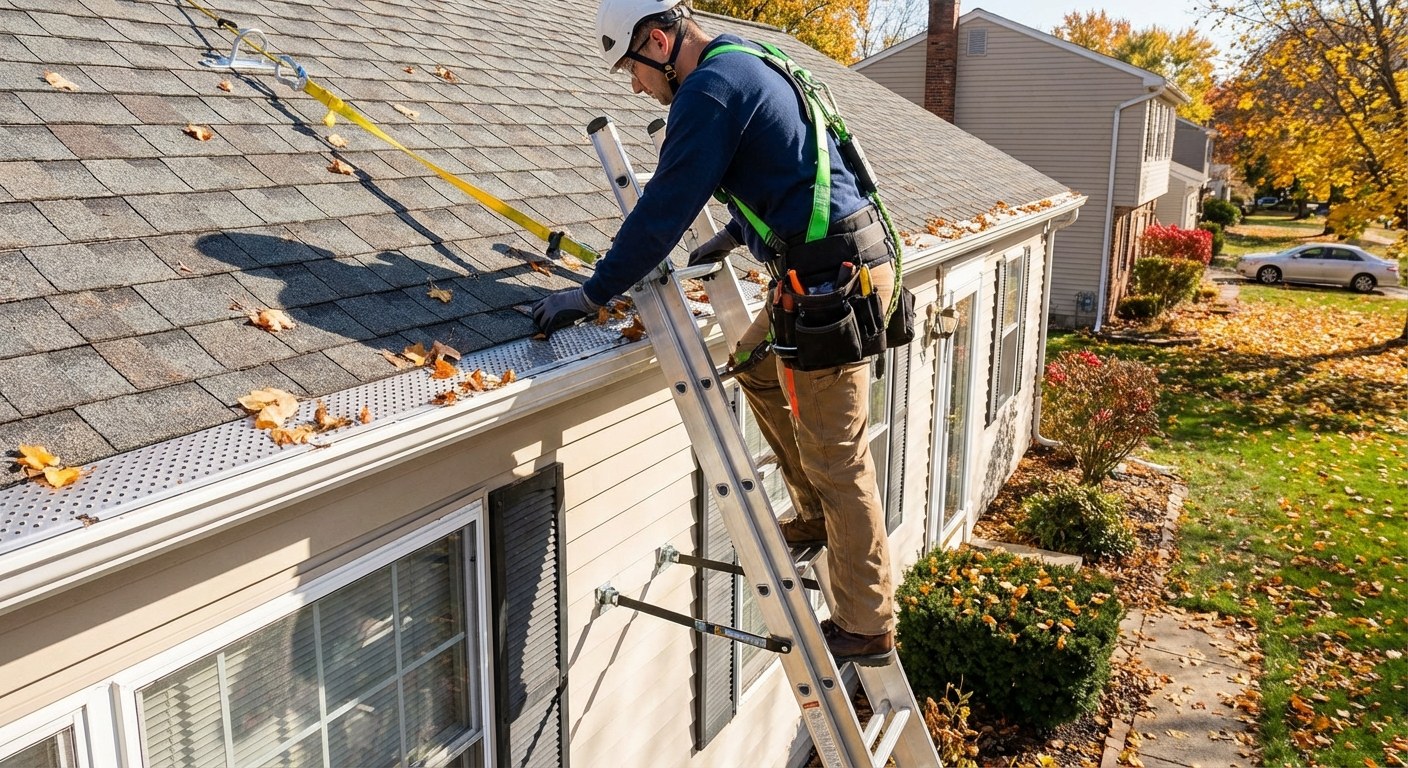
Your safety is the highest priority. Working on a ladder requires focus and preparation. Never attempt this work during wet, windy, or icy conditions.
Step 1: Perform a Safe Inspection
Before you can fix the problem, you need a clear view of it.
- Gear Up: Wear sturdy work gloves to protect your hands from sharp edges and safety glasses to shield your eyes from debris.
- Use the Right Ladder: Place a sturdy extension ladder on firm, level ground. The base should be one foot away from the wall for every four feet of height (a 75-degree angle).
- Work with a Helper: Always have a second person at the base of the ladder to keep it steady.
- Climb Carefully: Climb until your waist is about level with the gutter. Avoid overreaching; it’s much safer to climb down and move the ladder.
- Assess the Damage: Look along the length of your gutters. Count how many sections of the guard are bent, missing, or clogged. If the damage is limited to one, two, or maybe three sections, it’s likely a manageable DIY repair. If the damage is widespread, it’s a sign of a larger issue.
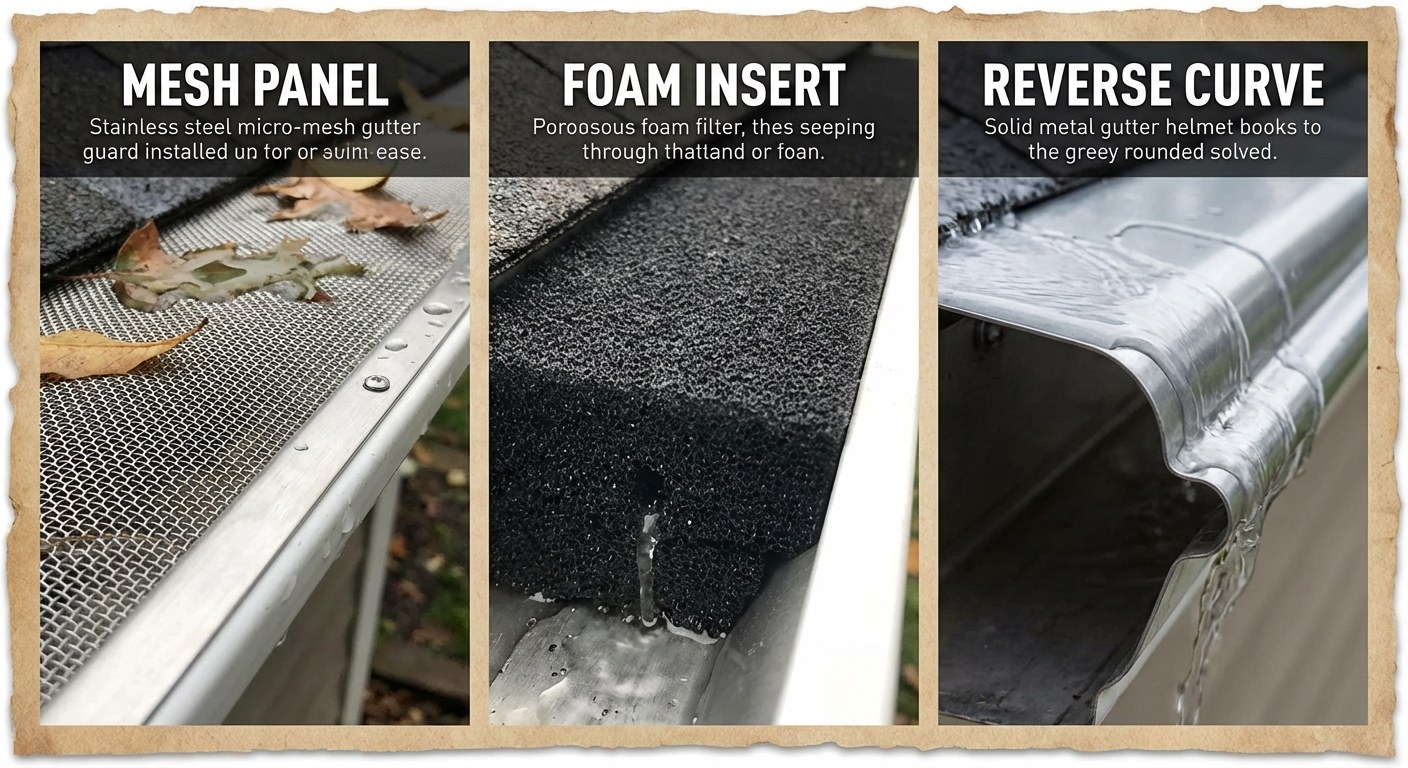
Step 2: Identify Your Gutter Guard Type
Gutter guards come in several styles, and your repair method will depend on which type you have. From your ladder, examine a damaged section to determine its type and how it’s attached.
- Mesh or Perforated Panels: These are flat or slightly raised panels with small holes or a screen-like mesh. They are very common and are often attached with small screws or clips, though some simply rest on the gutter lips and tuck under the shingles.
- Foam Inserts: These look like large, triangular sponges that sit inside the gutter. They are easy to install but can degrade over time or become clogged with fine sediment.
- Reverse Curve Guards: Also known as surface tension guards, these are smooth hoods that cover the gutter, allowing water to curve around the edge while leaves slide off.
Safe to Try Yourself: Fixing Minor Damage
If you’ve identified only a few damaged sections and feel comfortable on the ladder, you can proceed with a repair.
For Mesh or Perforated Panels
These are often the easiest to repair or replace.
If the panel is just loose and resting in place:
- Carefully lift the loose panel out of the gutter.
- Use a brush or gloved hand to clear any debris from that section of the gutter.
- Slide the back edge of the panel under the first row of roof shingles.
- Rest the front edge on the outer lip of the gutter, ensuring it lies flat.
If the panel is bent or broken and attached with screws or clips:
- Use a drill or screwdriver to remove the fasteners holding the damaged panel.
- Remove the old section. Measure its length and purchase a matching replacement panel from a home improvement store.
- Place the new panel over the gutter and secure it with new self-tapping screws or by snapping the clips back in place.
- Gently tug on the panel to ensure it’s secure.
For Foam or Reverse Curve Guards
These guards are typically installed in sections, making replacement straightforward.
- Pull the damaged foam block or reverse curve section out of the gutter.
- Inspect its condition. If it’s just misaligned, clean out any debris from the gutter and reinstall it, making sure it’s snug against the adjacent sections.
- If a foam insert is heavily deteriorated, moldy, or crumbling, it’s time to replace it. Measure the length and buy a matching replacement.
- Slide the new section firmly into place, ensuring there are no gaps.
Keeping track of annual inspections and minor repairs in a home management app like Casa can help you stay ahead of bigger problems.
When to Stop and Call a Professional
A DIY approach is not always the best solution. It’s time to call a professional gutter or roofing company if you encounter any of the following:
- Widespread Damage: If more than three or four sections are damaged, or you see warping, brittleness, or corrosion along most of the system, it may be a sign of product failure. A professional can assess whether a full replacement is needed.
- Gutter Damage: If the gutters themselves are sagging, bent, or pulling away from the fascia board (the board behind the gutter), this points to a more serious issue that needs expert attention.
- Safety Concerns: If the damage is on a second story or a steep roofline, or if you are not completely comfortable working on a ladder, hiring a professional is the safest choice.
Typical Time and Cost
- DIY Repair: For a few sections, you can expect to spend 1 to 2 hours on the project. The cost is minimal, usually between $15 and $50 for replacement panels, screws, or foam inserts.
- Professional Repair: Hiring a pro for minor repairs might cost between $150 and $400, depending on the extent of the work and your location. If a full replacement of your gutter guards is needed, costs can range from $7 to $15 per linear foot, varying widely based on the material and your home’s size.
A Clear Path Forward
Fixing a damaged gutter guard is a task well within reach for many homeowners. By performing a safe inspection and correctly identifying the problem, you can handle minor repairs yourself and save on costs. Most importantly, knowing when to step back and call a professional ensures the job is done right and protects both you and your home.
Being prepared is the key to managing your home without stress. To keep track of maintenance tasks, plan for future repairs, and get connected with vetted professionals in your area, download the Casa app. We're here to help you feel confident in every decision you make for your home.


